Sorting out your LinkedIn profile & privacy settings

Standard

You know how social networks can do annoying things you’re not expecting, like sending out alerts to everyone when you fiddle with your profile? LinkedIn seems to be the network I hear most comments about. It’s not the most intuitive of sites when it comes to adjusting one’s settings, yet leaving the default settings can lead to some surprises (the same can be said of Facebook.)

If you’re an aspiring writer looking for opportunities, new connections and wanting to be found on the web, then I do recommend having a presence on LinkedIn. Although it has many of the trappings of a social network, it’s actually the least social. You can join interest groups, start or join discussions, post updates, connect with people and all the rest. But you can also just set up your profile page and that’s it. There’s no huge obligation to do a lot more, unlike say Facebook or Twitter where no activity can seem like you’ve abandoned ship.

Whether you like it or not, LinkedIn is the go-to place on the web when checking out a person’s professional background. It has helped me out many times when I’ve wanted the real story about a person or a company, not the hype. LinkedIn encourages you to fill in all areas of your CV, and make them public. It’s funny how a quick glance at a person’s background often tells you everything you need to know, and then some!

If the thought of laying yourself bare on LinkedIn makes you nervous, not to worry – you can control how much people see and who sees what. Having said that, there’s no point being on LinkedIn if you’re going to be overly cagey. Concealing more than you reveal can look suspicious!

It’s worth spending a little time sorting out your LinkedIn privacy and profile settings so that you have them as you want them.

First of all, log into LinkedIn and access your settings by hovering over your avatar top right:

LinkedIn settings

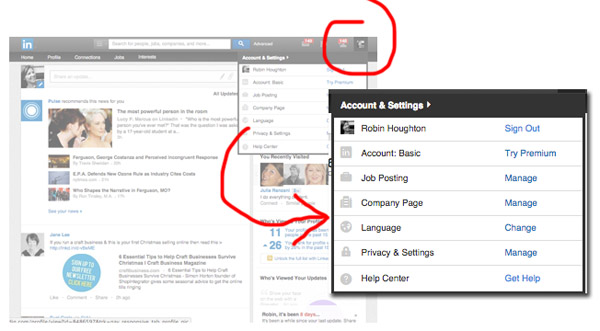
Click on ‘Privacy and Setttings’. You may well be asked to sign in again at this point, as another precaution. You’re then on a page with a number of sub-sections:

LinkedIn privacy & profile settings main

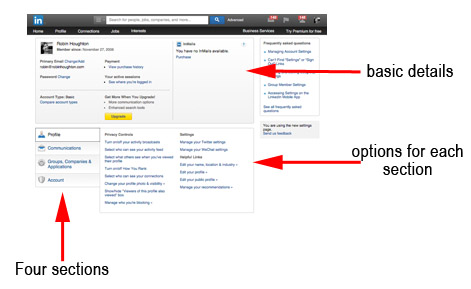
In the grey section top of page you can change or manage the basics of your account such as email address or password, or upgrade option.

Bottom left is a menu with four sections – Profile, Communications, Groups, companies and applications, and Account. For now we’re looking at Profile, so click on that you see two columns, on the left is – Privacy Controls and on the right Settings and Helpful links.  The left hand column is the one to focus on for now – I’m going to go through each item and explain what you need to think about.

NB If you make changes don’t forget to Save Changes for each item you change.

Turn on/off your activity broadcasts
If you’re happy for everyone to see when you make changes your profile, make recommendations, follow companies or do other activity on LinkedIn, then leave this box checked. Not everyone wants their activity made public. But on the other hand, a change can be a prompt for someone to get in touch. If you’re tweaking your profile for keywords or trying things out, turn this off. Every small change will trigger a ‘broadcast message’ to your network.

Select who can see your activity feed
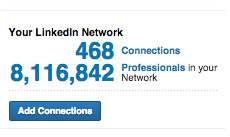
This refers to your status updates, articles or blog posts – basically they stuff you choose to put out there (rather than back office tweaks and changes). There’s not much point setting this to ‘Only me’. ‘Your Connections’ means those people you are linked in and only them. ‘Your network’ means your connections plus their connections – potentially a very big number. You can see just how big – LinkedIn tells you this in the right hand column of the home page when you’re logged in:

Your Network (size)

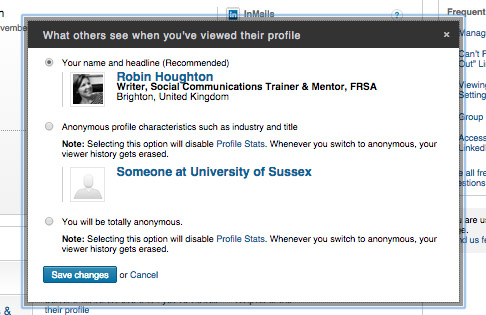
Select what others see when you’ve viewed their profile
Do you want people to know you’ve been checking out their profile? If you’re carrying out research prior to pitching a proposal, you may not want an editor, agent or publisher’s employees think you’re stalking them. On the other hand, you might want to draw attention to yourself. You have three options here and they’re all explained:

LinkedIn - what others see

Who can see your connections
Only your Connections can see who else you’re connected to, it’s not publicly visible. However, any endorsements you have are visible. One of the advantages of being connected to someone is that you can see who they know – if there’s someone you want to contact you can request an introduction (although there’s no obligation for your Connection to agree.) If you’d rather people didn’t know who you knew, you can check the ‘Only me’ option here.

Change your profile photo and visibility
Here’s where you can change not just your photo but all the other sections of your profile – Summary, Education, Publications, Experience and so forth. Your connections can see everything you publish here. But you can limit what is seen by everyone else (not connected to you) under your Public Profile settings – see below.

There are two things that are easy to miss on this screen – first of all, just below and to the side of your photo is a blue button ‘View Profile as’. Click on this and you can check what parts of your profile are visible to different types of visitors. The other thing is next to this blue button – hover over the little arrow and several options are revealed.

Edit profile options

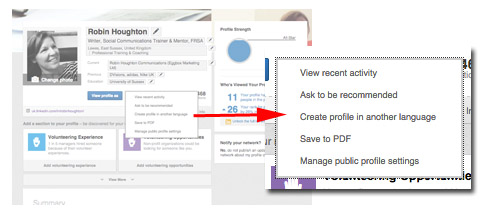
Did you know you could create a parallel LinkedIn profile in another language? You have to do the translating yourself, but LinkedIn gives you a separate URL for your foreign-language profile. You can also save your entire profile to a print-ready PDF – including your recommendations, which may be very useful to have as a hard copy. And it’s formatted very professionally. The last option is the important one for now – Manage Public Profile Settings. Click on this and you’re into a screen with a set of options on the right:

LinkedIn public profile settings

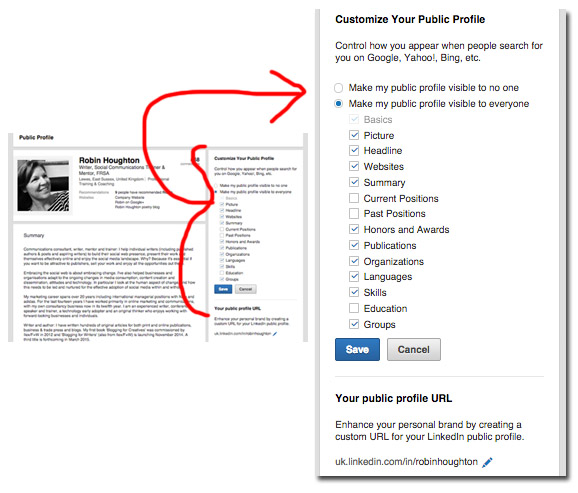
Basically you can select what bits of your profile are visible to people other than your Connections, and how much is revealed about you in web searches. You can also edit your public profile URL and make it something user-friendly. If you’re still using a URL with a load of number in it, why not change it to your name?

Now go back to your Privacy and Settings page (yes, you might have to sign in again!) and there are three more things under ‘Privacy Controls’: they are Turn On/Off How you rank, which I wouldn’t worry too much about, Show/hide “Viewers of this profile also viewed” box and Manage who you’re blocking, both of which are pretty much self-explanatory. With any luck you won’t have to block anyone, but the facility is there – click on the option to find out more.


Show your face on the web with a Gravatar

Standard

You’ve probably seen them around the web, on blogs, forums and author profiles – those little images next to people’s names. They’re called avatars, and they’re applied automatically whenever you post or comment. The good news is you don’t have set up your avatar again and again on every blog and media site you encounter, because the majority of them display the results from one place – Gravatar.

Gravatar stands for ‘Globally Recognised Avatar’, and it refers both to the individual icon itself (your Gravatar) and the site where you create one (Gravatar.com). As with most web apps, there’s no guarantee Gravatar will be around forever, but for the moment it seems to be stable and it’s recognised as an industry standard. Which is why I think it’s worth your while setting up your Gravatar if you haven’t already.

If you’re anything like me, you put a low priority on things like filling out your profiles, uploading profile images and keeping things up to date. There just seems to be too much else to do. But once you’ve set up your Gravatar you can kind of forget about it.

If you don’t yet have a Gravatar, chances are when you comment on a blog, or in the top right hand corner of your screen when you’re editing your WordPress blog, what you see is a grey shape or something anonymous, like this:

Anonymous user gravatar

Nobody wants to be a grey, mystery man! As you post comments on blogs, and are joining in conversations on the web, you want people to remember you. Research has shown that showing your face creates greater levels of trust, more shares and more interaction. Anonymity is too often associated with having something to hide. There’s nothing for it but to get yourself a decent Gravatar and join the people with faces.

Getting a Gravatar is simple and best of all it’s free. Signup at Gravatar.com, upload a photo – I always recommend a good, clear headshot – fill in a short profile, and really that’s it.

Most WordPress themes already come with Gravatar integrated (which means Gravatars will be displayed with your readers’ comments). But Gravatar is used on many, many sites, not just WordPress.

There are all kinds of add-on benefits to having a Gravatar, for example Hovercards – which means when you mouseover someone’s Gravatar you see their profile – it comes with WordPress.com blogs and can be added as a plugin to a self-hosted WordPress blog. Here’s an example of how it looks:

gravatar hovercards

You can see Gravatar in action in the foot of this post – I’ve installed a plugin called ‘Author Bio Box’ which displays your Gravatar information at the end of your blog posts. This is particularly good if you have guest bloggers or if there’s more than one of you running your blog.

You can change your Gravatar if you wish, but sometimes it takes a while to see the changes across the web. Try clearing your browser’s cache too, especially if you use Chrome, as Chrome sometimes keeps loading old versions of Gravatars even after you’ve made changes.

If you’re interested in how to build trust online there’s a ton of great stuff that’s been done in this area. Take a look at this blog post on Social Media Examiner, or read Chris Brogan’s book Trust Agents.

Writers: this is why you need a web presence

No search results
Standard

Writers are sometimes reluctant to ‘put themselves out there’ (as it’s often referred to) in terms of having a web presence.

Some of the common reasons cited:

– I don’t want people knowing about my private life
– My work should stand alone / speak for itself
– I don’t have time to be blogging, tweeting or wasting hours online
– It feels completely foreign to me
– It’s all so superficial and ‘me, me, me’

I could spend a lot of time and effort carefully questioning and counter-arguing these points, but I only do that if someone has asked for mentoring. If I’m in a class, or at an event or just having a conversation all I can do is try to inspire people, without pushing – either by example, or by telling stories – equipping people with all sides of the picture as best I can. If and when they change their minds the final motivation will come from within, not from someone saying ‘you ought to be doing this.’

It’s not just individual writers who can be social media refuseniks, it’s other areas of the publishing industry too. What the social web offers a small publishing press, for example, is a fantastic opportunity to ‘punch above its weight’. But too often the chance is missed.

So why do you need a web presence? How about “so that I’m not invisible”? Here are a couple of episodes to illustrate my point.

Example 1- publishers missing a trick

On two occasions in the last few months, I’ve read a debut poetry collection I’ve enjoyed, and wanted to feature the poets on my poetry blog. I’ve searched for their name on Google – ‘Fred Bloggs poet’ – and have found either nothing at all, or nothing that provides a method of contacting them.

Luckily, I ran into one of them at an event so was able to ask them for an email address, and the other I contacted their publisher, who forwarded my email to the poet.

One both occasions, once contacted, the poets responded promptly and were very happy to be featured since it exposed them to a new audience of readers and at least one review in a magazine. But if I’d had a long list of potential poets to feature, if I had less time or if I was less determined, I might have easily given up and moved onto someone else.

Interestingly, neither of the publishers involved followed up with me, or made much of the added exposure for their poet. It seems amazing to me that small poetry publishers, who we hear all the time are struggling for survival, wouldn’t make the most of the opportunity when offered free, unsolicited publicity. Did either of them send me a quick email to say ‘great review, thanks! can we send you the latest pamphlet from Joe Smith, in case you’d like to feature him too?’ or did they ‘like’ the blog post, leave a comment on the blog, mention it on their own website, even as a short news item, or tweet about it? No.

Example 2 – poets playing hard to get

I’m part of a newly-formed poets’ publishing collective. We work together to publish our own first pamphlets and promote one another’s writing career through social media and readings, with plans for skill-sharing workshops, an anthology and other events. Our strategy is not to call for submissions, but to approach individual poets who we feel would be a good fit, whose work we admire and who have yet to have a first pamphlet published.

There’s a lot of competition in poetry publishing – thousands of poets pay good money to enter pamphlet competitions in the hope of being published. You might think they would also make it easy for publishers to contact them. You know, in case the Faber poetry editor reads your wonderful poem in ‘The Rialto’ and wants to offer you a publishing contract. Or even if an events organiser wants to invite you to do a reading. Not so.

Several well-respected poets/magazine editors have offered us some names of poets they feel would be good to approach. They’ve taken the time and care to do this, as a favour. They believe it’s a wonderful opportunity for a few talented individuals they noticed.

So what happened? Of an initial list of ten names, three had no web presence at all, and of the four others we wanted to approach, two of them have proved impossible to make contact with. At least one of these did have a web presence but suggested the best way to contact them was via Facebook. Now, this assumes the person wanting to make contact is on Facebook themselves, and it also requires the poet to respond to messages from strangers on Facebook. In this case, our messages via Facebook have been unanswered.

I guess what I’m saying is, if you want your work to be read, and/or if you don’t want to miss out on career opportunities, you need to be contactable via a web search. At the very least get a free one-page profile at About.me and put an email address on it. And make it an address you do actually monitor! If you’re worried about spam then create a one-off email address at Yahoo and set it to forward to your ‘actual’ email box. Then if you have any trouble with it you can just shut down the Yahoo address.

And if you haven’t already then buy your domain name now. You can always park it until you’re ready to get a blog or a website or an email address that sounds like you own it.

Where to find images that are free to use

Standard

The web is fuelled by images – just look at the popularity of sites like Pinterest and Flickr and photosharing apps like Instagram. Time and again, research shows that Facebook and Twitter updates containing photos are shared and liked more often than purely text-based updates.

But it’s not as simple as trawling Google Images for suitable pics to use. You could find yourself facing a serious fine for breaching copyright laws.

You have a number of options:

1) Use photos you’ve taken yourself
2) Commission a photographer. Do check that you’ll have ownership of (and permission to use as you wish) the resulting photos.
3) Create your own graphical images from scratch using photo-editing software
4) Contact the owner of copyrighted images you want to use, and ask permission. This may be granted for a fee, or in return for a link back and attribution.
5) Obtain images from a photo library, where you generally pay a license fee for each image you use (but sometimes it’s free).

The last option on the list is probably the easiest. Stock image libraries carry thousands of photos, are easy to search and generally charge reasonable fees. Some even have a free images section. But don’t ignore Flickr. The images you’ll find there are generally not as marketing oriented as those in commercial image libraries. Many Flickr users attach Creative Commons licences to their images, and although you need to check, quite often the terms of the licence allows the photos to be used freely (on, for example, a blog) in return for proper attribution.

There are many image libraries – here are few of the popular ones to check out – some with a free images section –

Dreamstime
Free Range
Morguefile
Pixabay
iStock
Stock Vault

Compfight is a useful site – it’s a search engine for Flickr, enabling you to find images based on the type of license you’re after.

Google Images can still be a useful tool in the search for free-to-use photos. Try the Advanced Search option. Here’s an example: let’s say I’d like to illustrate a blog post with a photo related to the TV series ‘Downton Abbey’. Unsurprisingly, my first search on Google Images brings up thousands of results.

Image search on Google images

If I go to the cog icon top right, there’s a drop down menu – when click on Advanced Search I get a page of options. Scrolling down I come to ‘Usage Rights’. Here I select ‘Free to use or share, even commercially’.

Advanced Image Search

Then I hit ‘search’, and the results pages should contain only free-to-use photos…

Image search 3

However, there are flaws with this – images can be stripped of their license details, saved and re-uploaded, which doesn’t make them free to use even though Google Images presents them as so being. In this example, one of the Downton Abbey photos, although obviously a still shot from the show, is actually on somebody’s Flickr page. And if I enter this page’s URL into an image recognition engine such as Tin Eye it throws up 156 other pages where this photo appears. Just because a photo is being widely shared it doesn’t mean it’s free to use. Just be aware of that.