Tips for Choosing a WordPress.com Theme

Standard

I’ve recently been working with two different clients. One is an author wanting to upgrade from her adequate (but static, and a bit dated) website, the other is newly self-employed professional in a specific niche, and needing a web presence.

Both wish to be able to manage the sites themselves without having to call on a web designer or other tech help when they want to update the content. Neither is quite ready for a blog – at least to start with (I’ve persuaded them of the long-term benefits of having a blog, but first things first).

There were some similarities in the design brief: both wanted a ‘clean’ look, the ability to use their own image(s) in the header or masthead, the ability to use to a specific background colour. Both were looking at WordPress.com as a starting off point, mainly for its low maintenance aspect and to keep costs down. A hosted site at WordPress.com can always be ‘converted’ to a self-hosted WordPress site relatively easily. (For more on this, read my previous post about hosted versus self-hosted blogs.)

One of my first directions was to take a look at the range of WordPress Themes available. Were there any Themes they liked the look of? Personally I find it useful that you can browse by colour, or style, or industry, or even layout (number of columns and so forth). You can choose from Free Themes only, or All Themes (including those you pay for). The Theme Library is a whole bunch of goodies, and fun to explore. Or so I thought.

But both clients had the same reaction. They couldn’t choose. They couldn’t see past the fact that they were blog themes. All the examples shown were blogs, not websites. And there was TOO MUCH CHOICE. 

I should be used to this by now, but it still takes me by surprise – clients are much happier if I basically decide for them. I have three or four Themes I tend to suggest if the client has no strong preference. These are basic, clean, almost bland in their default form, but they allow for a certain amount of customising, and their look and layout suits what many people want from a website (as opposed to a blog).

So here are my tips for choosing a WordPress.com Theme, if you’re starting from first base and are a bit overwhelmed by the choice on offer:

Selecting a WordPress Theme

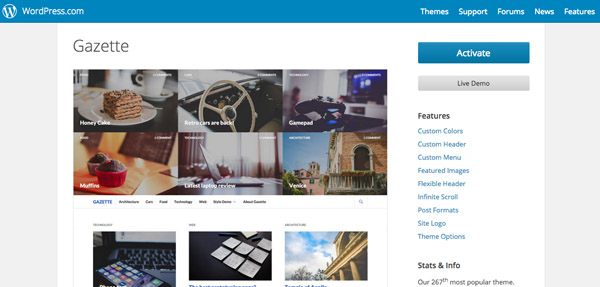
Click on the Theme name for more details

1) Read the detail – when browsing Themes, hover over the Theme thumbnail and click first on the Theme name for more information. This will bring up a page of detail about the Theme, examples and more. Do this before hitting ‘Live Demo’ and certainly before clicking on ‘Use this Theme’ – only click this when you are sure, as it will replace any current Theme you are using. If this is your first foray into Themes then it’s less drastic.

Look at the list of Features a Theme offers, they can vary widely

Different Themes offer different features

2) Layout – do you have any preferences about where the main menu should go? What do you think about a 2-column layout – with the sidebar on the right, or left? Do you want the option of a ‘magazine’ layout, with blocks of content on the page? Would you be happy with a large, deep masthead? Check out the Theme’s features. This is where you’ll see all the options. Some offer more than one menu, some have one-, two- or three-column page layout options, and more.

3) Images – don’t be put off by a Theme just because it appears to be image-heavy. The images are often optional, and Themes are shown at their best when populated by beautiful photos.

Gazette Theme

Don’t be put off by an apparently image-heavy Theme, or a Theme Name

4) Logo – some Themes have a logo in place that can’t be changed a great deal, others allow you to use your own logo.

5) Colours and font styles – what are you able to change? Some Themes offer 2 or 3 ‘palettes’ to choose from, and they might allow you to upload a custom background. But more likely you are stuck with the colours you see in the demo. Same goes for font, line height and other styles. However, if you upgrade you can modify these (see below).

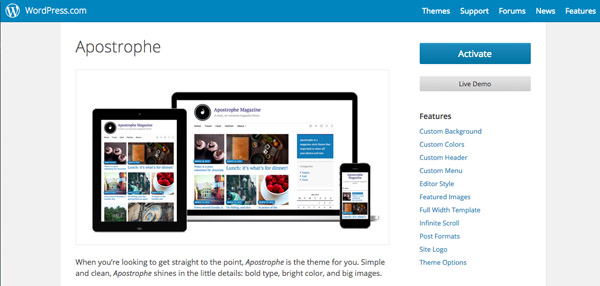
6) Check out examples – some Themes offer a link or two to actual blogs or websites using the Theme. They can be useful to see, and help you envisage the Theme ‘in action’. For example, the Hemingway Rewritten Theme shows six example blogs.

7) Try it – if this is your first Theme, just try one and see how you get on. If you find it doesn’t offer the features or flexibility you’re after, or there’s something you don’t like once you start using it, you can always change to another Theme. Build some trial time into your launch, if you’re planning a launch … a few weeks gives you time to try before making a final decision. And it’s one of the fun things about WordPress.com – a makeover is only a couple of clicks away.

If you find a Theme you like but want to customise it to a greater extent that the Theme allows, you have a couple of options.

CORRECTION: the Custom Design Upgrade is no longer available outside of the Premium hosting plan.

The first is to pay for the Custom Design Upgrade, currently $30 a year. This gives you access to more options, such as a custom background, more choice of fonts, and bespoke colours. It allows you to make alterations to the CSS, or stylesheet – this does require a bit of know-how, but it means you can really make the Theme your own.

However, since September 2014 WordPress.com has included the Custom Design upgrade in its new Premium hosting plan, along with other upgrades such as VideoPress (video hosting), No Ads, a custom site address, increased storage space and email support. The Premium package currently costs $99 a year,

CORRECTION: although it’s being offered to new UK customers for £85, which is a lot more than $99. A tax on UK customers?

which I think represents good value and it’s what I now recommend to WordPress.com clients. You can compare the different hosting plans here.

How to follow blogs in Hootsuite

Standard

Following other blogs is a big part of your life as a blogger. Just think of the inspiration, context, camaraderie and collaboration opportunities they offer. But how do you keep up with them? Do you use a feed reader, or hear of new posts via email, for example?

Because I blog using WordPress I’ve always found it easy to just hit the ‘Follow’ button on another WordPress site, and have the blog added automatically to my WordPress Reader. But for non-WordPress blogs, it’s not quite so easy – you have to copy and paste a blog or feed URL manually into your WordPress reader.

Also, with WordPress blogs, I have the option in my Reader to get a weekly email digest of new blog posts. This means every Monday morning I have a dozen or so alerts, and I can skim through them at the start of the day. But more than a dozen at a time would be too much for my inbox (or my Monday morning brain). And I don’t have this email option for non-WordPress blogs I subscribe to in Reader.

However, I recently took the plunge and decided to add all my blog subscriptions to my Hootsuite dashboard. I’d been putting it off because it wasn’t a high priority and I imagined it might be more complicated that it turned out to be, but I needn’t have worried.

So if you’re in a similar position, here’s a step-by-step guide to moving all your blog subscriptions to Hootsuite, so you can view blog updates anytime alongside your other social media accounts.

1) In WordPress, go to your Reader, and click on the cog next to ‘Blogs I Follow’ to bring up a list of your subscriptions.

Exporting feeds from WordPress

Click on ‘Export’. You’ll be prompted to save the export file (.opml).

2) Log in to your Hootsuite dashboard and Add a Tab and call it ‘Blogs’. (For this illustration I’ve called mine ‘Test’, because I already have a ‘Blogs’ tab.)

You’ll then be prompted to add a Stream to that tab – you have a choice of Networks, Apps or Shared. Select Apps, and click on Hootsuite Syndicator. If you don’t see that as a choice, click on ‘Get More Apps’. You can then search and install Hootsuite Syndicator (it’s free).

Hootsuite - add a stream

3) Under Hootsuite Syndicator, click on the RSS icon and you’re into the Subscription Manager screen.

Hootsuite subscription manager 1

Here you can either add individual feeds, or import a number of feeds. Do this by dropping in your .opml file.

4) If you have a lot of feeds to import it may take a few minutes, but eventually you’ll see all your feeds appear.

Export feeds to Hootsuite

5) Close the Subscription Manager, and you now have a ‘Blogs’ tab alongside your Twitter, Facebook or whatever you have … where you can skim through new blog posts and read them at any time.

I’d like to be able to read blog posts from my phone, but sadly it seems that Apps streams aren’t viewable on the mobile app version of Hootsuite. However you can read them on a tablet in a web browser.

Subscribing to new blogs

When I find a new blog I want to subscribe to, I now look for the RSS icon, rather than just hitting ‘follow’ or ‘follow by email’.

Look for the RSS icon to subscribe to posts

When I click on that, a box comes up inviting me to add the feed to my Hootsuite (you have to be logged into Hootsuite for this to happen).

Add feeds to Hootsuite 1Click on ‘Add to Hootsuite’ …

Add feeds to Hootsuite 2

I then select ‘add feed to existing tab’ and choose ‘Blogs’ – and the blog is added to my Blogs stream in Hootsuite. Done!

How to promote your blog posts on social media – manual vs automation methods

Standard

You’ve written a new blog post and hit ‘publish’.

What next? You may have subscribers who receive an email alert, either immediately or maybe in a weekly digest, together with other blogs they follow.

But what about reaching new readers? Your post may well come up in searches – particularly if you’ve thought about your keywords and used them strategically.

Blogs are part of the bigger social web, and the principal way they get found (and you get new readers) is via the sharing that happens on online social networks – not just directly from your blog, or on Twitter, Facebook, Google+ and so forth but also blogger communities, writers’ communities and special interest forums. But for sharing to take place, people have to know about your blog posts.

What can you do to help kickstart the sharing process? The answer is as much or as little as you like.

The manual method

How it works: You log onto your social network(s), write an update and post in the URL to your blog post. Some people see it, click on it and hopefully share it to their networks.

Upsides: doing it manually means you can write bespoke updates for each of your social networks, which may be desirable if you connect with different audiences and want to customise your language, or maybe not always post to a particular network. You will have a clear picture of what updates are being posted when and where, so you feel in control and happy that your audience won’t feel swamped with too much promo.

Downsides: it’s labour-intensive, especially if you post often and are active on a number of networks or forums. Unless you consistently use a URL shortener/tracker like bit.ly, you won’t be able to easily track who’s clicking or sharing. When it comes to Twitter, one update probably won’t do it, because it’s unlikely all your followers will be online and monitoring their feed at that one moment.

The basic automation method

If you blog with WordPress, it’s fairly easy to connect your blog with your social networks so that whenever you publish a new post, an alert goes out. From your Dashboard, go to ‘Settings’- ‘Sharing’. Here’s the page for my blog Poetgal, and you can see I have connected it to my Twitter and Google+ accounts.

Sharing settings on WordPress

Once you’ve done this, when you’re on the Edit Post page you’ll see your Publicise settings on the right of the screen:

Publicise on WP screenshot

If you click on ‘Edit’ you can customise the wording of the auto-update. Then when you hit ‘Publish’ the update and link to your blog post will be posted to your connected networks. There’s a good walk-through of Publicize here.

If you’re not using WordPress, don’t worry, there are third-party apps that do the same job no matter what blog platform you’re using, and some come with many more features (see below for the all-singing all-dancing options). For example, take a look at Twitterfeed or IFTTT (which stands for ‘If This Then That’).

Twitterfeed IFTTT


Upsides: You no longer have to go to your social networks and post each blog update, so it saves you a shedload of time, and having to think about it. Once these services are set up, they run in the background. An app such as IFTTT allows for quite specific targeting, using what it calls ‘recipes’. This means you can specify things like “If I publish a new post on my WP blog with the category ‘Twitter’ then post a tweet with image to @robinhoughton”. You can also set up automatic actions based on just about any activity on most social platforms.

Downsides: You may not want every update to go out on all your social networks, and if that’s the case you need to set up filters – always check what settings are available. These tools are pretty cool but there are so many of them it can feel overwhelming – it’s very easy to sign up for them as the basic versions are all free, but you need to keep a clear picture of what you’ve set up, otherwise you could end up multiple-posting. I’d advise finding a service you like and sticking with that. If you change any of your network passwords you’ll need to refresh the connections with any third party apps as they will stop running.

One of the main issues with basic, one-off auto posting is that it only happens once. So you have the same problem as manual posting in that not everyone will see your autopost. If this concerns you then you probably should choose an app that autoposts as many times as you like, at different times of day, what I would call managed automation.

The managed automation method

A step further from basic automation is to signup for a service that will allow you to manage a range of triggered actions based on your specifications. You can decide exactly what gets posted, where and when, and you usually have access to a whole range of other features such as browser extension allowing you to bookmark and share anything on the web, syndication of your blog posts to social bookmarking and media sites, and social analytics.

The good news is you don’t have to jump into using all the available features, and in fact the advanced features are usually only part of the premium (paid for) packages. Even so, the free versions of Hootsuite, Buffer and dlvr.it, for example, are all very good and worth checking out.

You can sign up with any of these services using your favourite social network (if you wish) or by creating a new username for that app. The free versions will have limits on how many social networks you can connect, access to analytics and custom features. But unless you are a pro blogger (running your blog as a business) then you’ll probably find the free services are plenty good enough. All these apps allow you to ‘queue’ your updates for re-posting across your networks at different times of day and on different days, in order to be seen by a bigger cross-section of your followers.

Upsides: These apps give more power to your social updates and take a lot of the elbow-grease out of it. Pro-bloggers swear by automation and there’s no doubt that if you are serious about making blogging pay, you need to spend less time doing things that can be automated, and more time on the stuff that requires brain-effort such as writing great blogs posts, interpreting your stats and nurturing strategic relationships.

Downsides: There will be some trial and error before you find the app(s) that suit you, and you need to pay attention to the setup. Automation isn’t for everyone: many people prefer slow-blogging: creating contacts more organically and growing a following based on recommendation and more personal promotional methods. That’s absolutely fine and if I’m honest I’m a bit of a slow-blogger myself. Having said that I do find Hootsuite invaluable as it gives me the right amount of automation and control while still keeping it real.

There’s a great deal of commercial clutter and over-promotion on the social web, and bombarding it with yet more isn’t on everyone’s agenda. However, you do want people to see your blog posts, and saving some of your precious time by taking advantage of the helpful tools available is, I think, a sensible choice.

How to make a custom menu widget for your blog

Standard

One of the beauties of blogging is not having to know any ‘backend’ stuff like code. But sometimes it’s good to know a little, because it gives you the means to customise some aspects of your blog.

I thought I would show you how to make a custom menu to go in the widget area of your blog. You can do this in WordPress (self-hosted OR hosted versions) or Blogger. Probably other platforms too, it depends on whether you have the TEXT widget option.

When might you want a custom menu?  A menu is really just a list of links: it’s usually associated with your site’s navigation – home, contact, about us etc. But it could be a list of your most important blog posts (the ones you want people to see), a list of your books with links to buy them, a list of forthcoming events or readings. Some blog themes only offer you one menu in one location. Others offer custom menu widgets, but they’re not always straightforward to set up. With a bit of HTML knowledge you can create as many custom menus as you wish, and include images as well as links.

If you look at the widgets area of your dashboard (or gadgets as they’re called in Blogger) you’ll see an array of options. Scroll through and find the one called TEXT (arbitrary text or HTML) and add or drag this to the position you want it.

text widget screenshot

When your widget’s in place, click on the down arrow on the right to customise it.

Here’s an example. I recently changed the theme on my Poetgal blog, and realised that the main menu is hidden when the screen width go below a certain size. That’s OK on phones because you usually have to touch a menu icon in the corner to see the whole menu. But on a desktop computer you expect to see the menu. I was concerned that several key pages – ‘About’, ‘Books’ and ‘Poetry readings’ – were going to be overlooked. So I needed a custom menu in the sidebar. So I positioned my text widget in the side bar and called it ‘May be of interest’:

custom widget 1

My custom menu is going to be a list of 3 links. In HTML, links look like this:

<a href=”URL of about page”>This is a link to ‘About'</a>

Every part of this this syntax is important – the space between the a and the href, the fact that there is no space between the = and the first “, and no space between the the angled brackets and what’s inside them. Notice also the closing tag </a> – this is where the link text ends. Between the opening and closing tags is the text that will be visible as a link. But we haven’t yet put in a valid URL (web page address).

If I wanted to reference the ‘About’ page on Poetgal, from here, I would paste in the full address including the ‘http’ bit. This goes inside the quote marks, like this:

<a href=”https://ukpoetgal.wordpress.com/about/”>This is a link to ‘About'</a>

Which then displays as:

This is a link to ‘About’

So, going back to my custom menu text widget, all I need to do is find the correct URLs of the pages I want to link to, and paste them using the syntax you see above. Just type the code out once and  copy and paste as many times as you want links, then paste in the correct links between the quote marks.

custom widget 2

I tend to leave a line space between each link, just so it’s easy for me to see how many I’ve got. But as long as you start each link on a new line, If you then tick the ‘automatically add paragraphs’ box then your links will display with a line space between each one.

Don’t forget to hit ‘save’ – and your widget is up!

custom widget 3


Notice that you haven’t had to worry about how the links look – they are automatically ‘styled’ like the rest of the blog. That’s because the styles (font, colours, sizes, spacing etc) is controlled from another file called a ‘Stylesheet’.

Even if you’re not using WordPress, HTML is a universal language. I’ve been typing <a href=”…”>linktext</a> since 1998 and it still works. Hooray!

It’s just as easy to add images and other stuff in a custom widget. In some circumstances it’s also possible to customise the Stylesheet. More about that in a later post.


Show your face on the web with a Gravatar

Standard

You’ve probably seen them around the web, on blogs, forums and author profiles – those little images next to people’s names. They’re called avatars, and they’re applied automatically whenever you post or comment. The good news is you don’t have set up your avatar again and again on every blog and media site you encounter, because the majority of them display the results from one place – Gravatar.

Gravatar stands for ‘Globally Recognised Avatar’, and it refers both to the individual icon itself (your Gravatar) and the site where you create one (Gravatar.com). As with most web apps, there’s no guarantee Gravatar will be around forever, but for the moment it seems to be stable and it’s recognised as an industry standard. Which is why I think it’s worth your while setting up your Gravatar if you haven’t already.

If you’re anything like me, you put a low priority on things like filling out your profiles, uploading profile images and keeping things up to date. There just seems to be too much else to do. But once you’ve set up your Gravatar you can kind of forget about it.

If you don’t yet have a Gravatar, chances are when you comment on a blog, or in the top right hand corner of your screen when you’re editing your WordPress blog, what you see is a grey shape or something anonymous, like this:

Anonymous user gravatar

Nobody wants to be a grey, mystery man! As you post comments on blogs, and are joining in conversations on the web, you want people to remember you. Research has shown that showing your face creates greater levels of trust, more shares and more interaction. Anonymity is too often associated with having something to hide. There’s nothing for it but to get yourself a decent Gravatar and join the people with faces.

Getting a Gravatar is simple and best of all it’s free. Signup at Gravatar.com, upload a photo – I always recommend a good, clear headshot – fill in a short profile, and really that’s it.

Most WordPress themes already come with Gravatar integrated (which means Gravatars will be displayed with your readers’ comments). But Gravatar is used on many, many sites, not just WordPress.

There are all kinds of add-on benefits to having a Gravatar, for example Hovercards – which means when you mouseover someone’s Gravatar you see their profile – it comes with WordPress.com blogs and can be added as a plugin to a self-hosted WordPress blog. Here’s an example of how it looks:

gravatar hovercards

You can see Gravatar in action in the foot of this post – I’ve installed a plugin called ‘Author Bio Box’ which displays your Gravatar information at the end of your blog posts. This is particularly good if you have guest bloggers or if there’s more than one of you running your blog.

You can change your Gravatar if you wish, but sometimes it takes a while to see the changes across the web. Try clearing your browser’s cache too, especially if you use Chrome, as Chrome sometimes keeps loading old versions of Gravatars even after you’ve made changes.

If you’re interested in how to build trust online there’s a ton of great stuff that’s been done in this area. Take a look at this blog post on Social Media Examiner, or read Chris Brogan’s book Trust Agents.

Software updates for your blog – are they important?

Add Plugin Page WP 4.0 Benny
Standard

If you have a hosted blog at, say, Blogger.com or WordPress.com, then one thing you don’t have to worry about is updating the software – it’s all done for you behind the scenes.

But if you self-host, it’s your responsibility. I sometimes get asked “Should I be worried about all those little red numbers on my dashboard, and messages telling me there’s a new version of WordPress, or my Theme, or a plugin?” The short answer is yes – although you could carry on without updating, and everything would probably work fine, there are reasons why it’s a good idea to stay on top of updates:

1) WordPress updates generally include a whole range of amendments to the code, including security fixes and improvements to the functionality of the software. In plain English, an update should make your site more secure from hackers and make it easier to do stuff.

2) Similarly, Theme updates can offer improved security, more design options and better compatibility with plugins. If you’ve paid for a premium theme, why not take advantages of updates? They’re like free upgrades, after all. An out-of-date Theme can cause plugins to work differently, or not at all.

3) Plugin updates are worth installing, again because they tend to bring improvements, and like Theme updates if you don’t run with them you risk them not working at some point in the future.

Non-functioning elements of a blog are not only annoying for you and for your readers, they can open the door to security breaches. You may think “No-one’s going to be interested in hacking into my blog!” but that’s not the point. Hackers, scammers and spammers have automated systems at work 24 hours on the web, looking for easy ways to peddle their own particular brand of ill-will. Unsecured blogs, no matter what they’re about, are fair game for them.

Warning – before installing updates:

1) first do a back-up of your blog

2) be aware that if you (or a developer) have done any customisation of your blog or Theme, or have any bespoke plugins, updating any of your blog software may affect those customisations. This is why it’s important to back everything up first. If you’re worried, as added precaution you can also take screenshots, which will help if (in the worst-case scenario) you need to rebuild everything!

The longer you leave updating, the riskier it can be to do so. So better to stay on top of it.

Today when I logged on I was prompted to update to WordPress 4.0 ‘Benny’. (Updates are given names, rather like hurricanes and computer viruses.) This short video explains the improvements it offers.

Formatting text in WordPress

Standard

As writers, we’re probably fussier than most when it comes to how our words look on our blog. Typefaces, character- line- and paragraph-spacing, font size, margins and indents are all important … and that’s before we even get into poetry with all its particular forms and layouts.

Basic formatting

First of all, here’s a basic primer in getting text the way you want it to look, how to add links and tips on formatting in WordPress, using the standard Edit screen. Click on Create New Post and you’re in the Edit screen.

WordPress edit screen 1

Type something in the Title and Body boxes. When you hit the ‘Return’ key you automatically start a new paragraph.

WordPress edit screen 2

This Edit screen is a word processor, so while you’re in the ‘Visual’ tab it gives you a preview of the finished blog post, albeit without the actual styles – you need to hit ‘Preview’ button to see an ACTUAL preview. (The other tab, ‘Text’, allows you to see and type in HTML – click on it to have a look but don’t worry if none of it makes sense, you shouldn’t need to open this if you don’t want to.)

Now, with your cursor highlight some text you want to make into a hyperlink, then click the ‘link’ icon in the menu bar (looks like a chain).

WordPress edit screen 3

The ‘Insert link’ box will pop up:

WordPress insert link

Paste in the destination link, give it a Title if you wish (a short description or the name of the page the link goes to), and if you want to link to open in a new window (if it’s an external link, for example) check that box. Then hit ‘Add Link’ and your linked text will appear underlined:

WordPress edit screen 5

The formatting menu

Many of the icons on the formatting menu bar will be familiar from word processing programs – underline, bold and lists, for example. Others you should explore to see what they do.

Particularly useful is the paragraphs styles drop-down menu. Highlight the text you want to make into a subhead, for example, and then choose one of the Headings sizes. Your Theme will have styles assigned to each of these, so try one or two out and see how they look. The sub-headings in this blog post are ‘Heading 3’, for example.

Paragraph styles in WordPress

Another useful formatting option is left or right indent, which is useful if you have a quote which you want to stand out. (A further option for this is the ‘Preformatted Text’ or just ‘Pre’ option under paragraph styles.)

Just remember – you first have to highlight the text you want to format or make into a link, then click the relevant icon.

There are other things you can change with the formatting menu, such as font colour, but just be aware that this will override your Theme’s styles and can end up looking messy. I would also avoid the ‘underline’ function, as this always causes confusion as to whether or not a word is a hyperlink.

Basically have fun experimenting – you can preview any changes and you can delete or amend anything, even after publishing.

Pasting from Word

WordPress has always had a slight issue with text that’s been formatted in word processing software (such as MS Word). It can mess up the formatting if you post directly from a Word document into the Edit Screen while in the Visual tab. There’s a more detailed explanation of this here. Historically, the ways around this were either to click on the ‘Paste from Word’ icon in the Formatting Menu (which works sometimes but not always), or to paste under the Text tab (but this means you have to re-do ALL the formatting), or copy your Word document into a plain text program such as TextEdit or NotePad, THEN paste into the Edit Screen. Tedious!

However, WordPress 3.9 (April 2014) claims to have solved the issue – yet another good reason to keep your version of WordPress up to date! 

Want to make more changes?

If you want to make changes beyond what you can do in the Edit screen, then the means available to you depends on whether you have a hosted blog at WordPress.com, or a self-hosted blog.

First of all, many decisions about fonts, spacing and the like are dictated by the styles of your chosen Theme. Themes do allow a certain amount of customisation, but it’s unlikely to be more than logo and colour schemes.

WordPress.com: If you (or someone you know) understands code, and is capable of making changes to the styles, then you can buy the Custom Design upgrade for $30 per year (per blog). This gives you access to the CSS (Styles) and the world is your oyster.

Self-hosted WordPress: You (or your techie help) have full access to the code and can make changes to the CSS at any time. But a less scary option might be to install pugins for whatever it is you want to change. A plugin is a piece of ‘add-on’ software that someone has already configured, so you don’t have to get your hands dirty. For example, if you want to choose from a larger range of fonts, you could install the free ‘Easy Google Fonts’ plugin.

There are millions of plugins for just about anything you want to do on your blog – access the Plugins Library from your Dashboard side menu, click the ‘Add New’ button and search by keyword. Be sure to read about the Plugin before installing it. Anyone can create plugins and they’re not all great, so check to see how many people have downloaded it, how many ‘stars’ it has got, how recent is the latest version. The best plugins are those that are kept up to date and actually work.


What kind of blog hosting is right for you?

Standard

What will you make?

Every blog is hosted somewhere on the web. Your options are either to have blog hosted by the platform provider, for example Blogger, Tumblr or WordPress.com ( a ‘hosted’ blog), or you can download blogging software (available from a number of providers) and have it hosted by a web host of your choice (‘self-hosted’).

The most common ‘self hosted’ blogging software is WordPress, but there are others. WordPress can be downloaded from WordPress.org (note the different web address!) WordPress is ‘open source’ which means anyone can alter it. This is both a good and a bad thing, as individual developers have the power both to enhance it and to break it.

One way to think of hosted versus self-hosted blogs is that a hosted blog is a bit like Lego building blocks – you can choose what you build but the bricks and other elements come in set sizes and shapes. This can limit your creativity but it does mean you can create a decent looking house, with the doors and windows already pre-made, quickly and easily. A self-hosted blog, on the other hand, is more like Play-Doh – you can bend, shape and style it into just about whatever you want, if you have a bit of skill and imagination. But it’s up to you to make it happen.

Benefits of a hosted blog

  • Basic version is free, although there various optional paid ‘extras’
  • Large choice of templates available
  • Very quick and easy to set up and maintain
  • No security issues to worry about
  • Reliable hosting (unlikely to ‘go down’ – but then again, you never know – see ‘benefits of self-hosting’ below)
  • Comes with a default address such as ‘yourname.wordpress.com’ or ‘yourname.blogspot.com’, but you can use your domain name if you wish
  • Easy to change templates if you get tired with the look
  • Hosted blogs are part of a large ready-made community of blogs and it’s easier to find and connect with others on your chosen platform

Cons

  • There are limits to how much you can customise templates or themes, especially within the free versions
  • With WordPress.com there are various ‘upgrade’ options, but they can add up: for example, to have your own domain name is $13 a year and if you want to customise a theme (template) the ‘custom design’ upgrade is $30 per year. (Whereas if you use Blogger you can customise the template for free, if you have the technical know-how)
  • Your content is your own, but there’s nothing to stop the blog host pulling your site or changing the terms without notice, so do regular backups of your content to your computer or cloud space.

Benefits of a self-hosted blog

  • You (or your developer, should you choose to employ one) have complete control over the design, including for example making your widgets match the overall design
  • You can choose your web host, and that means more choice of service level and pricing
  • You can have whatever functionality you require via plugins (bits of software you can install that work with the WordPress software). There are plugins for everything – from integrating your blog with a mailing list, improving security, running an ecommerce shop or serving adverts.
  • Many web hosting companies are geared up towards hosting WordPress software and offer ‘one click’ easy installation

Cons

  • You are responsible for keeping the software up to date – not just WordPress itself but any themes or plugins you install. Failure to do this can result in security breaches and your site not working as it should
  • The full version of WordPress may be more than you need, and you have to make a lot of decisions about things which come as standard in the hosted version

If you’re looking for a simple ‘out of the box’ blog and aren’t too worried about having a super-bespoke look and feel, if you’re not offended by having a blog address that includes the name of the hosting company, if you’re not really interested in running ads, or hosting video or having an online shop, then a basic hosted blog may be perfect.

If on the other hand you hanker after a blog/website with a unique look and some custom features, are happy to spend a bit of money in return for total control over what you can and can’t do, are confident about buying web space and aren’t phased by talk of ‘plugins’ and ‘configuration’, then you may want to go for a self-hosted solution.

Many, many high-profile writers opt for WordPress.com or Blogger.com and swear by them. So it’s not a question of starting with the ‘beginner’ version and working your way up.

Then again, one of the joys of a blog is that it’s not a big deal to start over on a different platform or template, as you can export/import all your content fairly easily. Sometimes you don’t know for sure what you want until you start, and sometimes your needs or tastes change over time.