Building your email list, part 1

Standard

A few years ago marketers, were all speculating on the future of email. With the rise in popularity of social media, and the seemingly hopeless issue of how to control spam, email looked like it might go the same way as the printed phone directory or the audio cassette.

But email is as popular as ever as a marketing tool.

Why you should build an email list

When someone opts in to receive email updates, they have given their permission to be marketed to and are a pre-sold audience. Direct response rates for permission marketing are higher than just about any other kind. The sender can communicate on an individual level with people, and can control the timing and frequency of the message.

By way of contrast, if you want to use social networks for marketing purposes you can only really do so with paid advertising. This is not permission marketing in the sense of it being shown only to people who have asked to see it, it is interruption marketing, or the old-style 20th century tactics which most of us endure (for the sake of ‘free’ services) rather than invite.

There’s nothing inherently wrong with trying some interruption marketing – Facebook ads, for example, can be very effective in certain circumstances. But permission marketing, in the form of an opt-in email newsletter, needn’t cost anything except your time to set up, and the payback long term is that you build a bona fide list of fans. And one of the best things about an email list is that it’s portable – Facebook may disappear overnight, your website may go down, but your email list is yours to keep.

How to create a sign-up form

To start building your email list you need to set up a few things:

1) You need an account with an email marketing service. There are plenty to choose from, but a good free service that integrates easily with various platforms is Mailchimp, so in this article I’ll use that as an example. (The principles explained here are relevant whatever email platform you choose.)

2) Decide what you’re going to be sending out, and how often – this needs to go on your sign-up form. A regular newsletter is a commitment, so manage people’s expectations and don’t over-promise. ‘Occasional updates’ is fine if you don’t want to be tied to a set publication schedule, but it’s not as compelling as ‘A weekly firehose of essential information and writerly tips’ or whatever. As marketers always say, ‘sell the benefits’. You can always tweak this.

3) (Desirable but not essential) – you need a platform from which to sign people up – for example your blog or website, and/or a Facebook Page.

Once you’ve got this far, the next step is to create a list in Mailchimp, Constant Contact, AWeber or whichever service you have signed up for, and a sign-up form for that list. Here’s how to do it in Mailchimp:

From your Mailchimp dashboard select ‘Lists’ from the menu and ‘Create List’. (You can create multiply lists and groups within lists.)

Mailchimp - add list 1

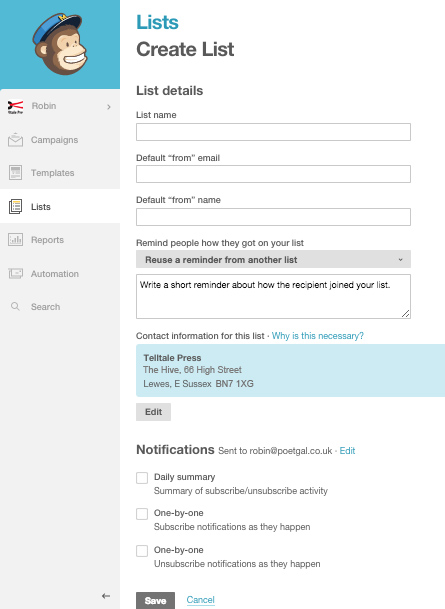
Creating and saving a list is fairly straightforward. Mailchimp ‘Support’ files are very good if you get stuck.

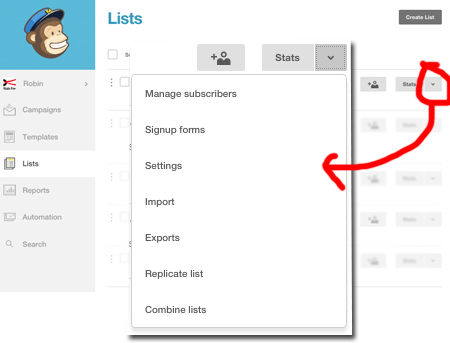
When you have a list, it will show up under ‘Lists’ together with any others you create. To add a sign-up form, click on the down arrow next to the list name and select ‘Sign-up forms’:

Mailchimp lists 2

Here’s where it can get a bit complicated. There are different form types to choose from.

For now, choose ‘General Forms’ and you’ll be guided through setting up your basic form – adding or deleting fields, adding some introductory text, plus some basic customising of colours.

mailchimp general form

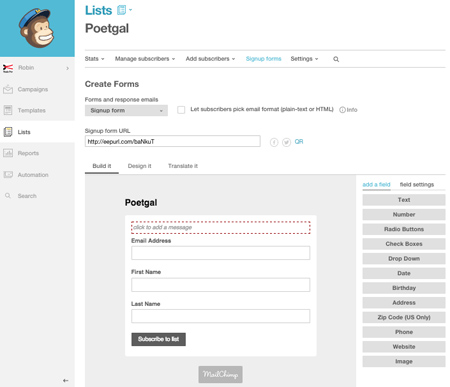
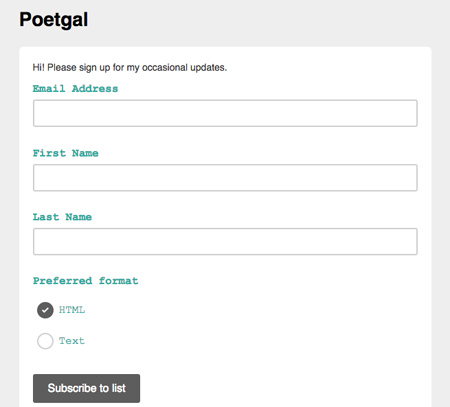
Once you’ve finished customising, you’ll see there’s a link to your form – ‘Sign-up Form URL’. If you don’t have a website, blog or anywhere else where you want to put the form, you can link here, from anywhere you like. This is the kind of thing people will see:

mailchimp hosted form

However, if you want the sign-up form in a widget on the sidebar or your blog, or on your Facebook page, or if you have a hosted blog (on Blogger or WordPress.com for example), you need to do a bit more work. Here’s where I hand you over to the excellent Mailchimp support articles:

How to add a sign up form to your website (‘Embedded form’)

How to add a sign-up form to a Blogger site

How to add a sign-up form to your self-hosted WordPress blog (not WordPress.com sites)

How to add a sign-up form to a Facebook Page

If you have a WordPress.com hosted blog, like mine at Poetgal, you won’t be able to embed your sign-up form in a widget, but there are ways to work around it. I actually have a sign-up form for my ‘Social Media Essentials’ email newsletter which is embedded in the side bar of this site (because it’s on a self-hosted WordPress platform), but I can’t embed it at Poetgal. So I just have a link to the hosted version of the ‘general’ form, which comes up in a new window when you click on the link:

Sign up form Poetgal

Having a sign-up form on your blog, or linking to a hosted version, is only really the first step in building your list. “If you build it they will come…”? Hmmm….not necessarily! In part 2 we’ll be looking at strategies to build your email subscriber list and examples of how to do it successfully.

When you have nothing to say – beating the social media blahs

Standard

It happens to us all – that sudden feeling that you’ve just got nothing much to say to the blogosphere, or the Twittersphere or whatever. It often coincides with that sinking feeling that everyone else seems to have endless ideas, inspiration, energy and motivation. How do you tackle it?

First of all, try to understand the problem – is it one of motivation? (‘Why am I doing this?’) Or finding the time? (‘I have too many other important things to do’) Or confidence? (‘No-one’s going to be interested in what I think’) Or even your general state of health & happiness? You may be physically or mentally exhausted, for example. We lead busy and complicated lives.

It’s crucial to be kind to yourself – nothing really terrible will happen if you don’t tweet for a week or blog for a month. If you need a break, take a break.

If you’ve started to build a social web presence and have found enjoyment from it, and if you still believe it’s something worth doing, there are things you can try that might help shake off the blahs and get you back to bouncing social media health.

‘Why am I doing this?’

Remind yourself it’s a slow process.

I often get told ‘I’m posting regularly to my blog and yet no-one comments.’ Or ‘If I post something to my Facebook Page and nobody comments or ‘likes’ it feels like a waste of time.’

We all need the positive affirmations that comments, likes and shares give us. But not everything you post will produce a visible effect. The vast majority of people using social media only comment on a tiny fraction of the updates they read, only read a fraction of what they see, and only see a fraction of what gets posted. It’s a big old iceberg out there, and it’s growing bigger all the time.

Rather than stressing about numbers of comments, likes etc (or lack of) remind yourself that you’re building your own social network one person at a time. Put your energies into that, and it will feel more rewarding. Reach out to other people on an individual level – add value to someone’s blog post with a good quality comment, thank someone for a link they posted on Twitter to an article you found useful, enrich your Facebook Page into a resource you’re proud to send people to when appropriate, don’t let it be just another promotional channel. Ask interesting questions, invite an expert to guest post on your blog.

‘I have too many other things to do’

I read two very interesting articles recently about this. One was quoting a study which found that people are happiest when they are focusing on one task only, and not letting their minds wander. It has nothing to do with how pleasurable the task is – you could be paying bills or making love. In today’s multi-tasking world it’s an interesting idea.

In another piece of research, it was found that having a ‘time scarcity’ mindset was crippling not only to our ability to think creatively, but also to how we are able to utilise effectively what little time we do have.  (A ‘time scarcity’ mindset means the feeling of being perpetually behind with things, general overwhelm, too many things needing our attention.) In other words, when we’re in that ‘I don’t have the time/I’m too busy’ zone, we’re less able to focus on the task at hand, so we can’t get as much done as we’d like, and it becomes a vicious circle. When we’re in this state (say the researchers) we tend to give a lower priority to things that aren’t urgent, to the detriment of our health, family, relationships and other long-term aspects of our lives.

Social media can seem to function at a frenetic pace. If you feel you’re struggling to keep up with people’s updates, or read all the blogs you’d like to, let alone do any posting or tweeting yourself, it’s worth reminding yourself that there are tools and tricks to help you manage your social media time, whether it’s having an editorial calendar for your blog, using an organising dashboard like Hootsuite, or installing an app to limit your time on social sites. And it’s better for body and soul to do one thing well, and slowly, than juggle five things because they’re all important.

‘Nobody is interested in what I think.’

This is a big one to unpack. First of all, you’d be surprised how many people are interested in what you think, what you say and how you say it. You’re a writer, so that gives you a head start: you know how to communicate. I’m not saying you just need to talk about what you had for dinner, although the fact that this has become such a cliche shows that plenty of people DO tweet about this and MANY of them have happy followers.

There are all kinds of social media guidelines about what to say or not to say, topics to avoid, how to entice people into following you or befriending you with great content or whatever. I’ve written a few myself! But they are only guidelines. We’re all making this up as we go along. There are examples everywhere of people breaking the ‘rules’ and chugging along very happily. Although the word ‘authentic’ has fallen from favour, I still believe it should be at the heart of any social media presence – which you are building one person at a time – so why expend energy on trying to create ‘ideal’ updates or worrying whether what you say won’t entertain or excite people every time. It’s your day-to-day life, not show business.

Sometimes it can be dispiriting to read about other people’s book deals, competition wins or successes. It’s as if everyone else is more successful AND they’re rubbing it in your face. But that’s a feeling we all have to deal with. I thought this piece on the subject was really helpful – How to Enjoy (and Not Envy) the Success of Others – especially the advice ‘don’t compare your insides to someone else’s outsides’. Indeed!

Every now and then someone will tell you how much they enjoy your blog posts or your Twitter updates or your Facebook Page and it will make your day. Keep on keeping on!

‘Blogging for Writers’ launch & blog tour

Blogging for Writers (UK edition) by Robin Houghton
Standard

In the last few weeks I’ve been busy with the launch of my new book, ‘Blogging for Writers’ (Ilex Press) and organising a blog tour to help promote it. Some wonderful writers are taking part, and it’s continuing through till the end of January 2015 (and possibly beyond! Some blogs have editorial schedules arranged months in advance.)

So I thought I would point you to a couple of blog posts that have already appeared.

On Emily Benet’s blog I wrote a guest post about how to create an editorial calendar. We all let the blogging slip from time to time (when book launches get in the way, for example!) but a calendar at least gives you a framework and a bank of ideas that you can call on when you’re really hit by ‘bloggers’ block’.

London-based Emily Benet is a fine writer who started off blogging, before getting her first book deal. Since then her writing career has really taken off. She also runs blogging workshops for writers. Here’s the post – A blogger’s best friend – the editorial calendar.

Yesterday I was interviewed on Tara Tyler Talks, the busy blog of fantasy author and writer of techno-futuristic thrillers, Tara Tyler. Tara asked me all kinds of interesting questions about blogging, marketing, Twitter and more, and here are my answers – Sprucing up the blog.

Tomorrow the book is getting a mention on the Facebook Page of acclaimed Scottish author Sara Sheridan, and coming up are more guest posts, interviews and reviews. I’ll keep you posted.

Now I’ve just got to consult my editorial calendar and schedule some more posts …:)

Sorting out your LinkedIn profile & privacy settings

Standard

You know how social networks can do annoying things you’re not expecting, like sending out alerts to everyone when you fiddle with your profile? LinkedIn seems to be the network I hear most comments about. It’s not the most intuitive of sites when it comes to adjusting one’s settings, yet leaving the default settings can lead to some surprises (the same can be said of Facebook.)

If you’re an aspiring writer looking for opportunities, new connections and wanting to be found on the web, then I do recommend having a presence on LinkedIn. Although it has many of the trappings of a social network, it’s actually the least social. You can join interest groups, start or join discussions, post updates, connect with people and all the rest. But you can also just set up your profile page and that’s it. There’s no huge obligation to do a lot more, unlike say Facebook or Twitter where no activity can seem like you’ve abandoned ship.

Whether you like it or not, LinkedIn is the go-to place on the web when checking out a person’s professional background. It has helped me out many times when I’ve wanted the real story about a person or a company, not the hype. LinkedIn encourages you to fill in all areas of your CV, and make them public. It’s funny how a quick glance at a person’s background often tells you everything you need to know, and then some!

If the thought of laying yourself bare on LinkedIn makes you nervous, not to worry – you can control how much people see and who sees what. Having said that, there’s no point being on LinkedIn if you’re going to be overly cagey. Concealing more than you reveal can look suspicious!

It’s worth spending a little time sorting out your LinkedIn privacy and profile settings so that you have them as you want them.

First of all, log into LinkedIn and access your settings by hovering over your avatar top right:

LinkedIn settings

Click on ‘Privacy and Setttings’. You may well be asked to sign in again at this point, as another precaution. You’re then on a page with a number of sub-sections:

LinkedIn privacy & profile settings main

In the grey section top of page you can change or manage the basics of your account such as email address or password, or upgrade option.

Bottom left is a menu with four sections – Profile, Communications, Groups, companies and applications, and Account. For now we’re looking at Profile, so click on that you see two columns, on the left is – Privacy Controls and on the right Settings and Helpful links.  The left hand column is the one to focus on for now – I’m going to go through each item and explain what you need to think about.

NB If you make changes don’t forget to Save Changes for each item you change.

Turn on/off your activity broadcasts
If you’re happy for everyone to see when you make changes your profile, make recommendations, follow companies or do other activity on LinkedIn, then leave this box checked. Not everyone wants their activity made public. But on the other hand, a change can be a prompt for someone to get in touch. If you’re tweaking your profile for keywords or trying things out, turn this off. Every small change will trigger a ‘broadcast message’ to your network.

Select who can see your activity feed
This refers to your status updates, articles or blog posts – basically they stuff you choose to put out there (rather than back office tweaks and changes). There’s not much point setting this to ‘Only me’. ‘Your Connections’ means those people you are linked in and only them. ‘Your network’ means your connections plus their connections – potentially a very big number. You can see just how big – LinkedIn tells you this in the right hand column of the home page when you’re logged in:

Your Network (size)

Select what others see when you’ve viewed their profile
Do you want people to know you’ve been checking out their profile? If you’re carrying out research prior to pitching a proposal, you may not want an editor, agent or publisher’s employees think you’re stalking them. On the other hand, you might want to draw attention to yourself. You have three options here and they’re all explained:

LinkedIn - what others see

Who can see your connections
Only your Connections can see who else you’re connected to, it’s not publicly visible. However, any endorsements you have are visible. One of the advantages of being connected to someone is that you can see who they know – if there’s someone you want to contact you can request an introduction (although there’s no obligation for your Connection to agree.) If you’d rather people didn’t know who you knew, you can check the ‘Only me’ option here.

Change your profile photo and visibility
Here’s where you can change not just your photo but all the other sections of your profile – Summary, Education, Publications, Experience and so forth. Your connections can see everything you publish here. But you can limit what is seen by everyone else (not connected to you) under your Public Profile settings – see below.

There are two things that are easy to miss on this screen – first of all, just below and to the side of your photo is a blue button ‘View Profile as’. Click on this and you can check what parts of your profile are visible to different types of visitors. The other thing is next to this blue button – hover over the little arrow and several options are revealed.

Edit profile options

Did you know you could create a parallel LinkedIn profile in another language? You have to do the translating yourself, but LinkedIn gives you a separate URL for your foreign-language profile. You can also save your entire profile to a print-ready PDF – including your recommendations, which may be very useful to have as a hard copy. And it’s formatted very professionally. The last option is the important one for now – Manage Public Profile Settings. Click on this and you’re into a screen with a set of options on the right:

LinkedIn public profile settings

Basically you can select what bits of your profile are visible to people other than your Connections, and how much is revealed about you in web searches. You can also edit your public profile URL and make it something user-friendly. If you’re still using a URL with a load of number in it, why not change it to your name?

Now go back to your Privacy and Settings page (yes, you might have to sign in again!) and there are three more things under ‘Privacy Controls’: they are Turn On/Off How you rank, which I wouldn’t worry too much about, Show/hide “Viewers of this profile also viewed” box and Manage who you’re blocking, both of which are pretty much self-explanatory. With any luck you won’t have to block anyone, but the facility is there – click on the option to find out more.


Show your face on the web with a Gravatar

Standard

You’ve probably seen them around the web, on blogs, forums and author profiles – those little images next to people’s names. They’re called avatars, and they’re applied automatically whenever you post or comment. The good news is you don’t have set up your avatar again and again on every blog and media site you encounter, because the majority of them display the results from one place – Gravatar.

Gravatar stands for ‘Globally Recognised Avatar’, and it refers both to the individual icon itself (your Gravatar) and the site where you create one (Gravatar.com). As with most web apps, there’s no guarantee Gravatar will be around forever, but for the moment it seems to be stable and it’s recognised as an industry standard. Which is why I think it’s worth your while setting up your Gravatar if you haven’t already.

If you’re anything like me, you put a low priority on things like filling out your profiles, uploading profile images and keeping things up to date. There just seems to be too much else to do. But once you’ve set up your Gravatar you can kind of forget about it.

If you don’t yet have a Gravatar, chances are when you comment on a blog, or in the top right hand corner of your screen when you’re editing your WordPress blog, what you see is a grey shape or something anonymous, like this:

Anonymous user gravatar

Nobody wants to be a grey, mystery man! As you post comments on blogs, and are joining in conversations on the web, you want people to remember you. Research has shown that showing your face creates greater levels of trust, more shares and more interaction. Anonymity is too often associated with having something to hide. There’s nothing for it but to get yourself a decent Gravatar and join the people with faces.

Getting a Gravatar is simple and best of all it’s free. Signup at Gravatar.com, upload a photo – I always recommend a good, clear headshot – fill in a short profile, and really that’s it.

Most WordPress themes already come with Gravatar integrated (which means Gravatars will be displayed with your readers’ comments). But Gravatar is used on many, many sites, not just WordPress.

There are all kinds of add-on benefits to having a Gravatar, for example Hovercards – which means when you mouseover someone’s Gravatar you see their profile – it comes with WordPress.com blogs and can be added as a plugin to a self-hosted WordPress blog. Here’s an example of how it looks:

gravatar hovercards

You can see Gravatar in action in the foot of this post – I’ve installed a plugin called ‘Author Bio Box’ which displays your Gravatar information at the end of your blog posts. This is particularly good if you have guest bloggers or if there’s more than one of you running your blog.

You can change your Gravatar if you wish, but sometimes it takes a while to see the changes across the web. Try clearing your browser’s cache too, especially if you use Chrome, as Chrome sometimes keeps loading old versions of Gravatars even after you’ve made changes.

If you’re interested in how to build trust online there’s a ton of great stuff that’s been done in this area. Take a look at this blog post on Social Media Examiner, or read Chris Brogan’s book Trust Agents.

Where to find images that are free to use

Standard

The web is fuelled by images – just look at the popularity of sites like Pinterest and Flickr and photosharing apps like Instagram. Time and again, research shows that Facebook and Twitter updates containing photos are shared and liked more often than purely text-based updates.

But it’s not as simple as trawling Google Images for suitable pics to use. You could find yourself facing a serious fine for breaching copyright laws.

You have a number of options:

1) Use photos you’ve taken yourself
2) Commission a photographer. Do check that you’ll have ownership of (and permission to use as you wish) the resulting photos.
3) Create your own graphical images from scratch using photo-editing software
4) Contact the owner of copyrighted images you want to use, and ask permission. This may be granted for a fee, or in return for a link back and attribution.
5) Obtain images from a photo library, where you generally pay a license fee for each image you use (but sometimes it’s free).

The last option on the list is probably the easiest. Stock image libraries carry thousands of photos, are easy to search and generally charge reasonable fees. Some even have a free images section. But don’t ignore Flickr. The images you’ll find there are generally not as marketing oriented as those in commercial image libraries. Many Flickr users attach Creative Commons licences to their images, and although you need to check, quite often the terms of the licence allows the photos to be used freely (on, for example, a blog) in return for proper attribution.

There are many image libraries – here are few of the popular ones to check out – some with a free images section –

Dreamstime
Free Range
Morguefile
Pixabay
iStock
Stock Vault

Compfight is a useful site – it’s a search engine for Flickr, enabling you to find images based on the type of license you’re after.

Google Images can still be a useful tool in the search for free-to-use photos. Try the Advanced Search option. Here’s an example: let’s say I’d like to illustrate a blog post with a photo related to the TV series ‘Downton Abbey’. Unsurprisingly, my first search on Google Images brings up thousands of results.

Image search on Google images

If I go to the cog icon top right, there’s a drop down menu – when click on Advanced Search I get a page of options. Scrolling down I come to ‘Usage Rights’. Here I select ‘Free to use or share, even commercially’.

Advanced Image Search

Then I hit ‘search’, and the results pages should contain only free-to-use photos…

Image search 3

However, there are flaws with this – images can be stripped of their license details, saved and re-uploaded, which doesn’t make them free to use even though Google Images presents them as so being. In this example, one of the Downton Abbey photos, although obviously a still shot from the show, is actually on somebody’s Flickr page. And if I enter this page’s URL into an image recognition engine such as Tin Eye it throws up 156 other pages where this photo appears. Just because a photo is being widely shared it doesn’t mean it’s free to use. Just be aware of that.

How to make a profile header image

Standard

Facebook was the first social network to introduce the big image banner on its profile pages, giving them a kind of blog-magazine look. Now it’s pretty standard – LinkedIn being the latest platform to roll it out. You can always stick with a standard old plain colour background or one of the free images that come with the platform. But why not create a custom image?

Your header image is a prime piece of online real estate – a strong header will increase your branding and visibility, showcase you or your work and help attract new connections. What I’m talking about here is the big image which spreads across the top and behind some elements of your profile page. (This is different from your profile photo/avatar/headshot.)

Here’s a quick run-through of what you need to know.

1) Find out the optimum size for your profile header image – this differs from one platform to another. (Remember that the image will display differently on tablets, mobile phones and computers with different size screen resolutions.)

Twitter - how to change your header image

You can change your Twitter header image in the settings as shown here, or just click ‘Edit Profile’ on your Profile page.

Recommended sizes are currently:

Twitter: (‘header image’) 1500 x 500 pixels, max 5mb

Facebook: (‘cover photo’) 851 x 315 pixels, minimum size 399 x 150 – but this will be stretched to fill.
There’s a great Facebook Page that explains in detail the current different areas of the cover picture, how it scales on mobile devices and more, so if you want to make a precise job of it then take a look and download the latest templates here.

LinkedIn: (header or ‘hero image’) 1400 x 425 pixels, max 4mb

YouTube Channel: (‘channel art’) 2560 X 1440 pixels. Refer to this helpful article to find out more, including how it will display on different devices.

Google Plus: (‘cover image’) Max size 2120 x 1192 pixels, minimum 480 x 270. However, to ensure maximum quality on all screens, tablets or smartphones, the recommended size is at least 920 x 250 px but not more than 1080 x 608 px, otherwise some of the information will get lost.

Here’s the Google+ step by step guide to uploading or changing your cover photo.

2) Check out what others are doing – find some striking examples of header images and get inspired.

3) Decide on what you want the image to convey. This is your showcase – what do you want to get across? Your personal ‘brand’? The genre or style of your writing? Something more specifically about your current book? Dates and times of forthcoming appearances? If your image is to contain specific information then make sure the important stuff is in the ‘safe’ areas of the image. Some of the resources referred to here will help you with that, or you can do it the old fashioned way – trial and error!

4) You can create a custom image even if you don’t have design tools like Photoshop. Check out Pixlr it’s a free online image manipulation software and easy to use.

5) Follow the instructions from your profile or settings page, and save your new header image. If it doesn’t quite fit or look right, you can tweak it and re-upload.

Facebook - update your cover image

In Facebook, hover over your cover photo and the ‘Update Cover Photo’ will appear – click on that

TIP: if you hit the ‘upload’ button but nothing happens, it could be that your image is too large (file size) or the wrong dimensions, or the wrong file type. You won’t always get a message telling you what the problem is. So if your image isn’t uploading double-check all the sizes and instructions about permitted file types (eg .jpg and .png may be permitted, but not .tif or .psd).

A basic SEO primer for writers, part 2

Standard

There are some simple steps you can take to help get your blog, website or profile found on the web. In part 1 we looked at what search engines do, how to find your keywords & how and where to use them.

But finding and using relevant keywords (sometimes referred to as ‘on-page SEO’) is only one part of the process. As well as relevance (as determined by keywords), search engines also look for recency and authority.

Update, update, update

The web is choked with old material. Some of this is still pertinent today. But there are long-abandoned websites, obsolete links and ancient blog posts galore. In Google’s worldview, new is best. The more recent the material the better. It’s a rather crude measure, but the principle is that anything posted on blogs five years ago will have been superseded by more up-to-date information. And certainly when it comes to online shopping, news, sport, the economy, weather and a lot of the day-to-day stuff, last week is old news.

If your blog, website or profile pages hasn’t been updated for a while, search engines will deliver more recent pages in their results, and yours may slide in the rankings. That’s one reason why a blog (rather than, or in addition to, a static website) is a good idea. As long as you post new material to it regularly (more than once a month).

Some business bloggers will tell you that it pays to post something every day, or certainly every week – that the more regularly and frequently you post, the more likely you are to see your search rankings improve, which will bring more visitors to your pages, more subscriptions/comments, the lot. This can happen – although it’s not everyone’s experience – but if writing is your primary business, rather than pro blogging, you would probably have to think very hard about making that kind of time commitment to blogging.

It’s not who you know, it’s who knows you

To stand out in some way on the web, you need an authoritative presence. Authority, as measured by search engines, is demonstrated by a number of things, but it basically boils down to who knows you. One indicator is the quality of inbound links. There are websites and bloggers with proven authority – think BBC, national newspapers, Huffington Post, Mumsnet, Richard & Judy and so forth – and if they link to you, it’s seen as an indication of your authority.

You might reasonably be thinking ‘oh sure, I’ll just go and get my book reviewed at the Guardian – how easy is that?’ OK so it may not be so simple. But there are opportunities to be had once you start looking: commenting on articles, answering calls for reader stories, taking part in online workshops or discussions, guest blogging, submitting your blog or site to a directory.

Start with the ‘low hanging fruit’ – if you’re a member of a professional association, make sure your blog or website (or Facebook Page, if that’s your primary hub) is listed (with a link) in their online directory. Then go to the media sites in your niche and pitch an article, a guest blog, a review. Check out the social sites where your readers (or potential readers) hang out and see what you can contribute there. Always ask for a link to your blog or profile page in the byline. Be aware, however, that these days many links are ‘nofollow’ – which means search engines are directed not to follow them, and therefore won’t offer you any SEO benefit. So by all means link-build, but do it for the PR and exposure rather than purely ‘link juice’.

Getting inbound links used to be a mainstay of SEO, but these days authority is established and demonstrated as much by a person’s social web presence – who are you connected to? Who follows you/links to you/retweets you? Who has you in their circles?

Being a good social web citizen does pay off in terms of SEO. Do everything you can to facilitate this. For example, make sure your various social profiles link to your hub (whether it’s your blog/website, your Amazon author page, your Facebook Page or whatever).

If you’re interested, go over to Klout.com and find out how you fare in terms of social authority. Compare yourself to other writers in your field. But don’t get too hung up on Klout – it’s only an indicator.

The bottom line is this: by all means pay attention to SEO, but a strong social web presence will do wonders for your web visibility and is more likely to open doors.

A basic SEO primer for writers, part 1

Standard

It’s incredibly easy to be invisible on the web. One of the big questions I get asked is, unsurprisingly, when I put my name/book title/topic into Google, why does my blog/website not come up top?

To understand the answer to this, and to do something about it, requires a bit of basic knowledge about the art and science of helping webpages get found in searches – what’s commonly termed ‘search engine optimisation’, or SEO for short.

What search engines do (and don’t do)

  1. The goal of any search engine is to deliver up the most relevant results.
  2. As well as relevance, search engines look for authority and for recency.
  3. Search engines cannot ‘read between the lines’ or make intelligent assumptions. They take the words that are being searched for, scour webpages on which those words appear, rank those pages according to various criteria, and serve up the results. Yes, the calculations they employ (algorithms) are complex, but they are nothing compared to how the human brain operates – this is why we don’t always get the search results we’re expecting.

Once you’re clear about these 3 points it becomes easier to optimise your blog or website.

The exact algorithms used by search engines are top secret and change all the time. This is simply because there’s BIG MONEY in getting high Google rankings. For some businesses, such as financial services, travel and the big ecommerce sites, the difference between coming up 3rd or 13th in a search can be millions of pounds in lost business.

For you or me, it’s probably less crucial. But that doesn’t mean it’s not worth knowing a bit about the game.

Let’s start with keywords – the words or phrases people are searching for.

Finding your keywords

Try asking yourself this question, substituting various words or phrases for ‘ABC’:

When people search for ‘ABC’ on Google, I want them to find my blog/my author page on Goodreads/my article about XYZ.

Keep going until you have a list. They may be single words (eg ‘writer’), or phrases (eg your name, or ‘fantasy writer Kent’) or groups of words (eg ‘writer YA Man Booker’). Try different combinations of similar phrases. If you run out of ideas, scoot around the websites of others in your genre, or the discussion forums on Goodreads or niche community sites and see if any more phrases occur to you.

Now try searching for those phrases and see what comes up. At the very top of the search engine results page (sometimes this gets abbreviated to SERP) you can see how long the search took and approximately how many pages were searched. This tells you how competitive a phrase is. The more competition, the harder it’s going to be to be ‘top of Google’ for that phrase.

For example, no individual is ever likely to come top for the word ‘writer’, because there are about 202 million pages vying for top position:

search results - 'writer'

Think about how you conduct searches yourself – you probably try to be as specific as you can, don’t you? Which tends to involve a phrase or group or words rather than single words. Let’s say you’ve heard that there’s a Young Adult novel on the Man Booker Prize shortlist, but you don’t know the name of the author. You might search for ‘writer YA man booker’:

Search result

Notice that for this search there are a mere 808,000 pages deemed to be relevant. So the phrase is less competitive than ‘writer’ and more targeted. Compared to the search results for ‘writer’, these results look pretty close to what the searcher is looking for.

What about being found for your name? Surely that’s not too much to ask for? It depends. Here’s the SERP from a search for ‘Victoria Grefer’:

Victoria Grefer

Victoria has managed to dominate page one of Google. Because her name is relatively unusual, she starts with an advantage: there are just 16,700 pages competing to be found. Having said that, she has a good presence across a range of sites – her own website comes top, closely followed by her Goodreads page, her Twitter account, Facebook and Amazon.

Now if I search for Catherine Smith, this is what I get:

Catherine Smith writer search

Catherine is a writer with a national, if not international, reputation, but it’s harder for her to come top for her name alone. Look at the competition – nearly 16 million pages – and none of those photos is of her! Nonetheless her site does appear 4th on the page. A search for ‘Catherine Smith writer’ gives a very different result:

Catherine Smith writer search

(Bear in mind these results can differ depending on your search history, whether you’re logged into Google, whether you’ve visited a page many times before, and so on. Google tries to customise your results. So if you want an unbiased view of your rankings it’s a good idea to do so from a public computer.)

Once you have your keywords/phrases, you need to ensure they appear on the page you are optimising. This could be your blog ‘about’ page, or a page on your website or blog where you’re promoting your latest book, your author profile on a third-party site, or all of the above – it’s up to you.

Try to select just one or two keywords/phrases per page. If you try to be found for too many phrases then your page loses its specificity and its relevance to a search become diluted.

Where to put your keywords/phrases

  1. In the headline – the title of your article, blog post or web page
  2. In the first paragraph
  3. In any appropriate link text
  4. In the HTML of the page – Title, Description, Alt text (for images), Link Titles … you may or may not have access to all of these, depending on the blogging or webpage software you use. But these are all elements scoured by Google. Good SEO plugins for WordPress (self hosted) are All in One SEO or Yoast.

NB:

  • It’s important not to ‘keyword stuff’ as you’ll get penalised for that.
  • It’s important that your page still sounds natural and reads well. Write for your reader. There’s nothing worse that the ‘death by SEO’ articles that are all over the web – generally written purely with search engines in mind and devoid of useful content.

In part 2 I’ll talk a bit more about authority, links and how social media works with SEO.


Formatting text in WordPress

Standard

As writers, we’re probably fussier than most when it comes to how our words look on our blog. Typefaces, character- line- and paragraph-spacing, font size, margins and indents are all important … and that’s before we even get into poetry with all its particular forms and layouts.

Basic formatting

First of all, here’s a basic primer in getting text the way you want it to look, how to add links and tips on formatting in WordPress, using the standard Edit screen. Click on Create New Post and you’re in the Edit screen.

WordPress edit screen 1

Type something in the Title and Body boxes. When you hit the ‘Return’ key you automatically start a new paragraph.

WordPress edit screen 2

This Edit screen is a word processor, so while you’re in the ‘Visual’ tab it gives you a preview of the finished blog post, albeit without the actual styles – you need to hit ‘Preview’ button to see an ACTUAL preview. (The other tab, ‘Text’, allows you to see and type in HTML – click on it to have a look but don’t worry if none of it makes sense, you shouldn’t need to open this if you don’t want to.)

Now, with your cursor highlight some text you want to make into a hyperlink, then click the ‘link’ icon in the menu bar (looks like a chain).

WordPress edit screen 3

The ‘Insert link’ box will pop up:

WordPress insert link

Paste in the destination link, give it a Title if you wish (a short description or the name of the page the link goes to), and if you want to link to open in a new window (if it’s an external link, for example) check that box. Then hit ‘Add Link’ and your linked text will appear underlined:

WordPress edit screen 5

The formatting menu

Many of the icons on the formatting menu bar will be familiar from word processing programs – underline, bold and lists, for example. Others you should explore to see what they do.

Particularly useful is the paragraphs styles drop-down menu. Highlight the text you want to make into a subhead, for example, and then choose one of the Headings sizes. Your Theme will have styles assigned to each of these, so try one or two out and see how they look. The sub-headings in this blog post are ‘Heading 3’, for example.

Paragraph styles in WordPress

Another useful formatting option is left or right indent, which is useful if you have a quote which you want to stand out. (A further option for this is the ‘Preformatted Text’ or just ‘Pre’ option under paragraph styles.)

Just remember – you first have to highlight the text you want to format or make into a link, then click the relevant icon.

There are other things you can change with the formatting menu, such as font colour, but just be aware that this will override your Theme’s styles and can end up looking messy. I would also avoid the ‘underline’ function, as this always causes confusion as to whether or not a word is a hyperlink.

Basically have fun experimenting – you can preview any changes and you can delete or amend anything, even after publishing.

Pasting from Word

WordPress has always had a slight issue with text that’s been formatted in word processing software (such as MS Word). It can mess up the formatting if you post directly from a Word document into the Edit Screen while in the Visual tab. There’s a more detailed explanation of this here. Historically, the ways around this were either to click on the ‘Paste from Word’ icon in the Formatting Menu (which works sometimes but not always), or to paste under the Text tab (but this means you have to re-do ALL the formatting), or copy your Word document into a plain text program such as TextEdit or NotePad, THEN paste into the Edit Screen. Tedious!

However, WordPress 3.9 (April 2014) claims to have solved the issue – yet another good reason to keep your version of WordPress up to date! 

Want to make more changes?

If you want to make changes beyond what you can do in the Edit screen, then the means available to you depends on whether you have a hosted blog at WordPress.com, or a self-hosted blog.

First of all, many decisions about fonts, spacing and the like are dictated by the styles of your chosen Theme. Themes do allow a certain amount of customisation, but it’s unlikely to be more than logo and colour schemes.

WordPress.com: If you (or someone you know) understands code, and is capable of making changes to the styles, then you can buy the Custom Design upgrade for $30 per year (per blog). This gives you access to the CSS (Styles) and the world is your oyster.

Self-hosted WordPress: You (or your techie help) have full access to the code and can make changes to the CSS at any time. But a less scary option might be to install pugins for whatever it is you want to change. A plugin is a piece of ‘add-on’ software that someone has already configured, so you don’t have to get your hands dirty. For example, if you want to choose from a larger range of fonts, you could install the free ‘Easy Google Fonts’ plugin.

There are millions of plugins for just about anything you want to do on your blog – access the Plugins Library from your Dashboard side menu, click the ‘Add New’ button and search by keyword. Be sure to read about the Plugin before installing it. Anyone can create plugins and they’re not all great, so check to see how many people have downloaded it, how many ‘stars’ it has got, how recent is the latest version. The best plugins are those that are kept up to date and actually work.