How to make a profile header image

Standard

Facebook was the first social network to introduce the big image banner on its profile pages, giving them a kind of blog-magazine look. Now it’s pretty standard – LinkedIn being the latest platform to roll it out. You can always stick with a standard old plain colour background or one of the free images that come with the platform. But why not create a custom image?

Your header image is a prime piece of online real estate – a strong header will increase your branding and visibility, showcase you or your work and help attract new connections. What I’m talking about here is the big image which spreads across the top and behind some elements of your profile page. (This is different from your profile photo/avatar/headshot.)

Here’s a quick run-through of what you need to know.

1) Find out the optimum size for your profile header image – this differs from one platform to another. (Remember that the image will display differently on tablets, mobile phones and computers with different size screen resolutions.)
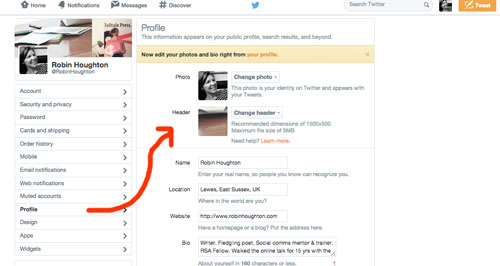
Twitter - how to change your header image

You can change your Twitter header image in the settings as shown here, or just click ‘Edit Profile’ on your Profile page.

Recommended sizes are currently:

Twitter: (‘header image’) 1500 x 500 pixels, max 5mb

Facebook: (‘cover photo’) 851 x 315 pixels, minimum size 399 x 150 – but this will be stretched to fill.
There’s a great Facebook Page that explains in detail the current different areas of the cover picture, how it scales on mobile devices and more, so if you want to make a precise job of it then take a look and download the latest templates here.

LinkedIn: (header or ‘hero image’) 1400 x 425 pixels, max 4mb

YouTube Channel: (‘channel art’) 2560 X 1440 pixels. Refer to this helpful article to find out more, including how it will display on different devices.

Google Plus: (‘cover image’) Max size 2120 x 1192 pixels, minimum 480 x 270. However, to ensure maximum quality on all screens, tablets or smartphones, the recommended size is at least 920 x 250 px but not more than 1080 x 608 px, otherwise some of the information will get lost.

Here’s the Google+ step by step guide to uploading or changing your cover photo.

2) Check out what others are doing – find some striking examples of header images and get inspired.

3) Decide on what you want the image to convey. This is your showcase – what do you want to get across? Your personal ‘brand’? The genre or style of your writing? Something more specifically about your current book? Dates and times of forthcoming appearances? If your image is to contain specific information then make sure the important stuff is in the ‘safe’ areas of the image. Some of the resources referred to here will help you with that, or you can do it the old fashioned way – trial and error!

4) You can create a custom image even if you don’t have design tools like Photoshop. Check out Pixlr it’s a free online image manipulation software and easy to use.

5) Follow the instructions from your profile or settings page, and save your new header image. If it doesn’t quite fit or look right, you can tweak it and re-upload.

Facebook - update your cover image

In Facebook, hover over your cover photo and the ‘Update Cover Photo’ will appear – click on that

TIP: if you hit the ‘upload’ button but nothing happens, it could be that your image is too large (file size) or the wrong dimensions, or the wrong file type. You won’t always get a message telling you what the problem is. So if your image isn’t uploading double-check all the sizes and instructions about permitted file types (eg .jpg and .png may be permitted, but not .tif or .psd).

Seven things to do on Twitter this week

Standard

There’s so much more to Twitter than just posting links to your blog posts or tweeting the odd ‘what I’m up to’ update.

I’ve found Twitter to be a fantastic tool for connecting with all sorts of people I wouldn’t otherwise have met. OK, so it was easier in the early days, when there were fewer of us using it and before the marketers and scammers had moved in!

If you’re wondering how on earth to unlock the real power of Twitter then let me tell you there are no quick fix ways of doing it, but take it one day at a time and in six months you’ll wish you’d started a year ago.

It’s about small things … and they all add up. To give you an idea what I mean, here are seven tasks to set yourself, one for each of the next seven days. Come on, how hard can that be? Just remember a general point – when you refer to another person or entity in a tweet, reference them by their Twitter (@) name, because that way they will see your tweet. If you don’t know their Twitter name, use the Twitter search box to find it.

So here goes…

1) Do something nice for someone

This might be, for example, answering a question, or retweeting a question you can’t answer yourself, but one of your followers might. You might tweet how much you enjoyed someone’s latest book, or review, or poem in such-and-such magazine. Or how about starting a conversation with someone who’s new to Twitter or not very active, to encourage them along?

2) Retweet something useful and say why

If you’ve just learned something useful, or come across a resource you know your followers will find useful, or a news story people will want to know about, tweet a link to it. Add your own comment or endorsement.

3) Find THREE book bloggers/reviewers to follow

You can use the Twitter search box to search for names or keywords, or do a general search on Google – look for people who actively review work in your genre. You might find one, and then from their lists of followers or followees you might find more. Don’t follow more than three at a time, for now … if you stumble of a rich seam of people to follow, go to point 4 –

4) Start a new list

Remember you can add someone to a list without actively following them as an individual. You can then follow that list. If you’re using Tweetdeck or Hootsuite, create a new column for that list and voila. (See this post about Lists if you’re not sure).

5) Find a writing-related hashtag and use it

There are so many great writing hashtags, many of them are ‘slow chats’ – in other words, it’s an ongoing conversation around a theme. Well-used ones are #amwriting, #selfpublishing and #kidlitchat. But there are many, many more –  here’s a mammoth list of Twitter hashtags for writers!

6) Take a long hard look at your profile page

When did you last refresh it? Could it do with a makeover? The new profile pages allow for a wonderfully big header image – make the most of this space. Look at how other people are using it, get some inspiration. What about your profile picture? Looking a tad tired? And your bio – are you making the best use of your 160 characters, with key words for people to find you by?

7) Thank someone

Ah yes – we so often forget to this. Who doesn’t love to be thanked? Just think for a moment – is there someone you follow on Twitter (who perhaps you’ve never met) who often tweets useful things, or answers questions, or retweets other people’s posts? A ‘thank you’ out of the blue from a relative stranger is a wonderful thing.

Have a great week on Twitter – who knows, you might set yourself another #7things for the week after, and the week after …