How to follow blogs in Hootsuite

Standard

Following other blogs is a big part of your life as a blogger. Just think of the inspiration, context, camaraderie and collaboration opportunities they offer. But how do you keep up with them? Do you use a feed reader, or hear of new posts via email, for example?

Because I blog using WordPress I’ve always found it easy to just hit the ‘Follow’ button on another WordPress site, and have the blog added automatically to my WordPress Reader. But for non-WordPress blogs, it’s not quite so easy – you have to copy and paste a blog or feed URL manually into your WordPress reader.

Also, with WordPress blogs, I have the option in my Reader to get a weekly email digest of new blog posts. This means every Monday morning I have a dozen or so alerts, and I can skim through them at the start of the day. But more than a dozen at a time would be too much for my inbox (or my Monday morning brain). And I don’t have this email option for non-WordPress blogs I subscribe to in Reader.

However, I recently took the plunge and decided to add all my blog subscriptions to my Hootsuite dashboard. I’d been putting it off because it wasn’t a high priority and I imagined it might be more complicated that it turned out to be, but I needn’t have worried.

So if you’re in a similar position, here’s a step-by-step guide to moving all your blog subscriptions to Hootsuite, so you can view blog updates anytime alongside your other social media accounts.

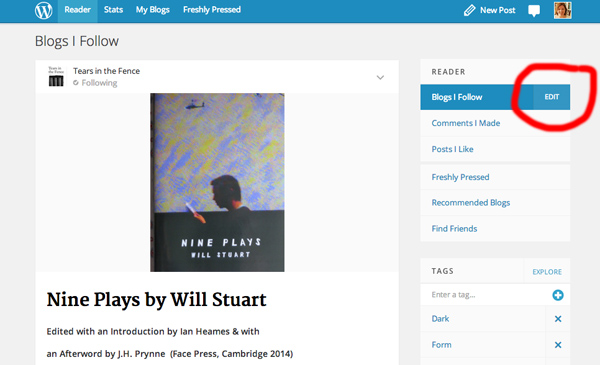
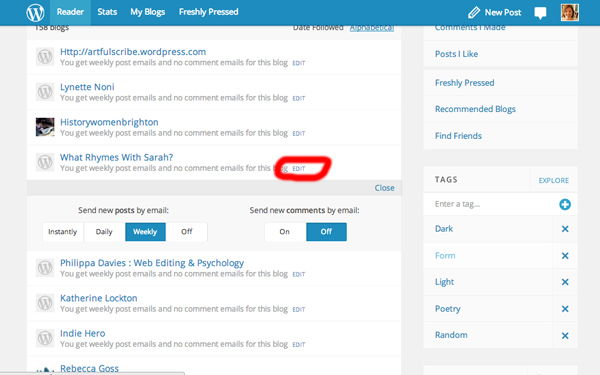
1) In WordPress, go to your Reader, and click on the cog next to ‘Blogs I Follow’ to bring up a list of your subscriptions.

Exporting feeds from WordPress

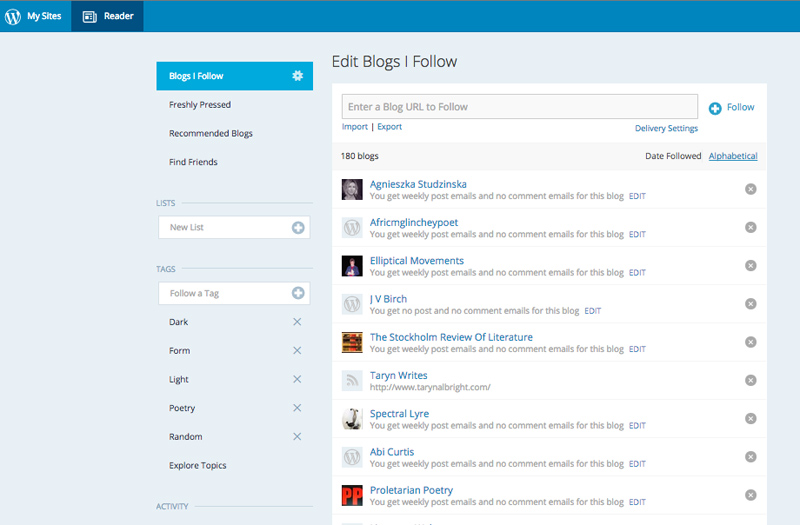
Click on ‘Export’. You’ll be prompted to save the export file (.opml).

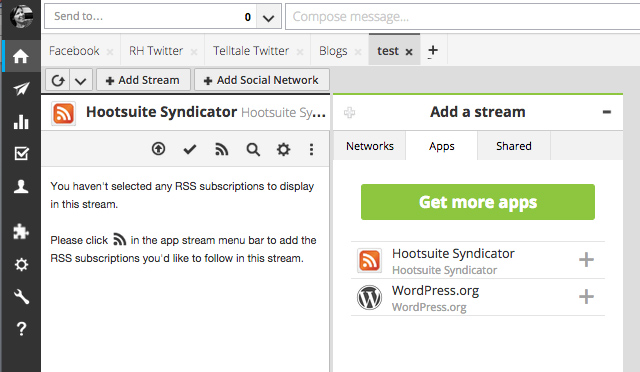
2) Log in to your Hootsuite dashboard and Add a Tab and call it ‘Blogs’. (For this illustration I’ve called mine ‘Test’, because I already have a ‘Blogs’ tab.)

You’ll then be prompted to add a Stream to that tab – you have a choice of Networks, Apps or Shared. Select Apps, and click on Hootsuite Syndicator. If you don’t see that as a choice, click on ‘Get More Apps’. You can then search and install Hootsuite Syndicator (it’s free).

Hootsuite - add a stream

3) Under Hootsuite Syndicator, click on the RSS icon and you’re into the Subscription Manager screen.

Hootsuite subscription manager 1

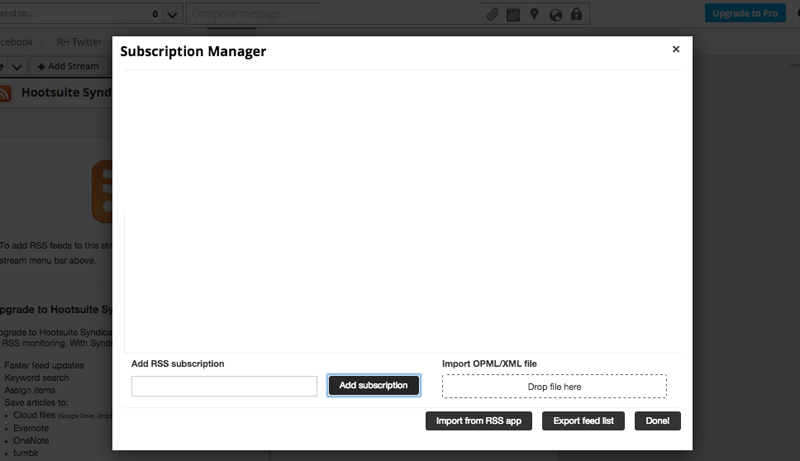
Here you can either add individual feeds, or import a number of feeds. Do this by dropping in your .opml file.

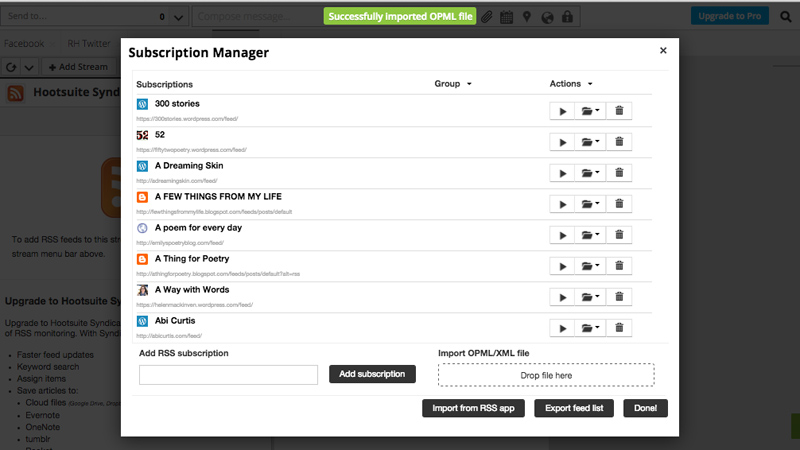
4) If you have a lot of feeds to import it may take a few minutes, but eventually you’ll see all your feeds appear.

Export feeds to Hootsuite

5) Close the Subscription Manager, and you now have a ‘Blogs’ tab alongside your Twitter, Facebook or whatever you have … where you can skim through new blog posts and read them at any time.

I’d like to be able to read blog posts from my phone, but sadly it seems that Apps streams aren’t viewable on the mobile app version of Hootsuite. However you can read them on a tablet in a web browser.

Subscribing to new blogs

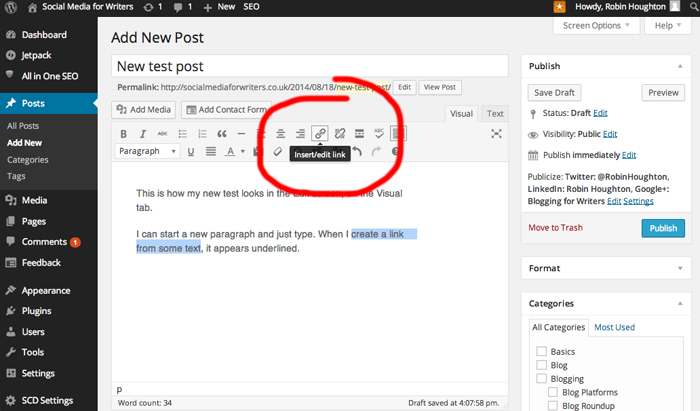
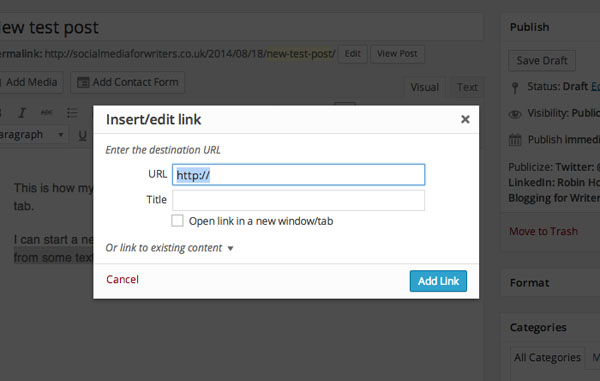
When I find a new blog I want to subscribe to, I now look for the RSS icon, rather than just hitting ‘follow’ or ‘follow by email’.

Look for the RSS icon to subscribe to posts

When I click on that, a box comes up inviting me to add the feed to my Hootsuite (you have to be logged into Hootsuite for this to happen).

Add feeds to Hootsuite 1
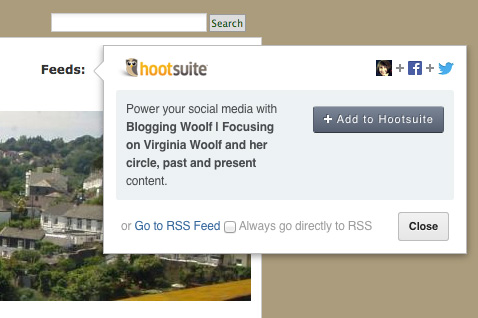
Click on ‘Add to Hootsuite’ …

Add feeds to Hootsuite 2

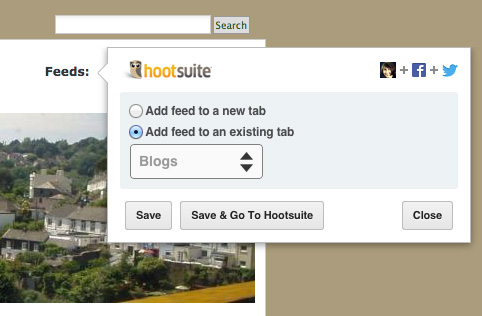
I then select ‘add feed to existing tab’ and choose ‘Blogs’ – and the blog is added to my Blogs stream in Hootsuite. Done!

Show your face on the web with a Gravatar

Standard

You’ve probably seen them around the web, on blogs, forums and author profiles – those little images next to people’s names. They’re called avatars, and they’re applied automatically whenever you post or comment. The good news is you don’t have set up your avatar again and again on every blog and media site you encounter, because the majority of them display the results from one place – Gravatar.

Gravatar stands for ‘Globally Recognised Avatar’, and it refers both to the individual icon itself (your Gravatar) and the site where you create one (Gravatar.com). As with most web apps, there’s no guarantee Gravatar will be around forever, but for the moment it seems to be stable and it’s recognised as an industry standard. Which is why I think it’s worth your while setting up your Gravatar if you haven’t already.

If you’re anything like me, you put a low priority on things like filling out your profiles, uploading profile images and keeping things up to date. There just seems to be too much else to do. But once you’ve set up your Gravatar you can kind of forget about it.

If you don’t yet have a Gravatar, chances are when you comment on a blog, or in the top right hand corner of your screen when you’re editing your WordPress blog, what you see is a grey shape or something anonymous, like this:

Anonymous user gravatar

Nobody wants to be a grey, mystery man! As you post comments on blogs, and are joining in conversations on the web, you want people to remember you. Research has shown that showing your face creates greater levels of trust, more shares and more interaction. Anonymity is too often associated with having something to hide. There’s nothing for it but to get yourself a decent Gravatar and join the people with faces.

Getting a Gravatar is simple and best of all it’s free. Signup at Gravatar.com, upload a photo – I always recommend a good, clear headshot – fill in a short profile, and really that’s it.

Most WordPress themes already come with Gravatar integrated (which means Gravatars will be displayed with your readers’ comments). But Gravatar is used on many, many sites, not just WordPress.

There are all kinds of add-on benefits to having a Gravatar, for example Hovercards – which means when you mouseover someone’s Gravatar you see their profile – it comes with WordPress.com blogs and can be added as a plugin to a self-hosted WordPress blog. Here’s an example of how it looks:

gravatar hovercards

You can see Gravatar in action in the foot of this post – I’ve installed a plugin called ‘Author Bio Box’ which displays your Gravatar information at the end of your blog posts. This is particularly good if you have guest bloggers or if there’s more than one of you running your blog.

You can change your Gravatar if you wish, but sometimes it takes a while to see the changes across the web. Try clearing your browser’s cache too, especially if you use Chrome, as Chrome sometimes keeps loading old versions of Gravatars even after you’ve made changes.

If you’re interested in how to build trust online there’s a ton of great stuff that’s been done in this area. Take a look at this blog post on Social Media Examiner, or read Chris Brogan’s book Trust Agents.

Formatting text in WordPress

Standard

As writers, we’re probably fussier than most when it comes to how our words look on our blog. Typefaces, character- line- and paragraph-spacing, font size, margins and indents are all important … and that’s before we even get into poetry with all its particular forms and layouts.

Basic formatting

First of all, here’s a basic primer in getting text the way you want it to look, how to add links and tips on formatting in WordPress, using the standard Edit screen. Click on Create New Post and you’re in the Edit screen.

WordPress edit screen 1

Type something in the Title and Body boxes. When you hit the ‘Return’ key you automatically start a new paragraph.

WordPress edit screen 2

This Edit screen is a word processor, so while you’re in the ‘Visual’ tab it gives you a preview of the finished blog post, albeit without the actual styles – you need to hit ‘Preview’ button to see an ACTUAL preview. (The other tab, ‘Text’, allows you to see and type in HTML – click on it to have a look but don’t worry if none of it makes sense, you shouldn’t need to open this if you don’t want to.)

Now, with your cursor highlight some text you want to make into a hyperlink, then click the ‘link’ icon in the menu bar (looks like a chain).

WordPress edit screen 3

The ‘Insert link’ box will pop up:

WordPress insert link

Paste in the destination link, give it a Title if you wish (a short description or the name of the page the link goes to), and if you want to link to open in a new window (if it’s an external link, for example) check that box. Then hit ‘Add Link’ and your linked text will appear underlined:

WordPress edit screen 5

The formatting menu

Many of the icons on the formatting menu bar will be familiar from word processing programs – underline, bold and lists, for example. Others you should explore to see what they do.

Particularly useful is the paragraphs styles drop-down menu. Highlight the text you want to make into a subhead, for example, and then choose one of the Headings sizes. Your Theme will have styles assigned to each of these, so try one or two out and see how they look. The sub-headings in this blog post are ‘Heading 3’, for example.

Paragraph styles in WordPress

Another useful formatting option is left or right indent, which is useful if you have a quote which you want to stand out. (A further option for this is the ‘Preformatted Text’ or just ‘Pre’ option under paragraph styles.)

Just remember – you first have to highlight the text you want to format or make into a link, then click the relevant icon.

There are other things you can change with the formatting menu, such as font colour, but just be aware that this will override your Theme’s styles and can end up looking messy. I would also avoid the ‘underline’ function, as this always causes confusion as to whether or not a word is a hyperlink.

Basically have fun experimenting – you can preview any changes and you can delete or amend anything, even after publishing.

Pasting from Word

WordPress has always had a slight issue with text that’s been formatted in word processing software (such as MS Word). It can mess up the formatting if you post directly from a Word document into the Edit Screen while in the Visual tab. There’s a more detailed explanation of this here. Historically, the ways around this were either to click on the ‘Paste from Word’ icon in the Formatting Menu (which works sometimes but not always), or to paste under the Text tab (but this means you have to re-do ALL the formatting), or copy your Word document into a plain text program such as TextEdit or NotePad, THEN paste into the Edit Screen. Tedious!

However, WordPress 3.9 (April 2014) claims to have solved the issue – yet another good reason to keep your version of WordPress up to date! 

Want to make more changes?

If you want to make changes beyond what you can do in the Edit screen, then the means available to you depends on whether you have a hosted blog at WordPress.com, or a self-hosted blog.

First of all, many decisions about fonts, spacing and the like are dictated by the styles of your chosen Theme. Themes do allow a certain amount of customisation, but it’s unlikely to be more than logo and colour schemes.

WordPress.com: If you (or someone you know) understands code, and is capable of making changes to the styles, then you can buy the Custom Design upgrade for $30 per year (per blog). This gives you access to the CSS (Styles) and the world is your oyster.

Self-hosted WordPress: You (or your techie help) have full access to the code and can make changes to the CSS at any time. But a less scary option might be to install pugins for whatever it is you want to change. A plugin is a piece of ‘add-on’ software that someone has already configured, so you don’t have to get your hands dirty. For example, if you want to choose from a larger range of fonts, you could install the free ‘Easy Google Fonts’ plugin.

There are millions of plugins for just about anything you want to do on your blog – access the Plugins Library from your Dashboard side menu, click the ‘Add New’ button and search by keyword. Be sure to read about the Plugin before installing it. Anyone can create plugins and they’re not all great, so check to see how many people have downloaded it, how many ‘stars’ it has got, how recent is the latest version. The best plugins are those that are kept up to date and actually work.


Managing notifications for a quieter life

Standard

Have you ever felt overwhelmed by email notifications and wished you could just turn them all off?

It’s something that people often complain about, and it seems to be a big ‘turn off’ factor. You know the kind of thing:  “LaserHub and three other people followed @Starbucks” “Congratulate Jim on his new job!” “It’s Kathy’s birthday, send her a message” “@NiceCommenter has liked your post” … etc. Too many of these clog up your inbox and tend to just be annoying.

Social networks and blog providers want to keep you engaged and encourage you to login every day, and many of these alerts are simply designed to nudge you into action. The thinking is that once you’re happy using the tool and into a pattern of regular usage, you’ll stick around, become a valuable member of the community (in more ways than one – obviously there’s no such thing as a free social network, and your continued participation adds to the mass of data that’s used to sell advertising and other services. I know this is a controversial issue and not everyone is happy with it. But my attitude is that things have to be paid for, and as long as you understand the trade off AND protect your privacy in all the ways open to you, you can still enjoy the services provided.)

Notifications are often turned ON by default, but if you’re still finding your way around you may not know how to certain notifications off, or even that you can.

It’s important to take control and find out what you can turn off and how, before you reach the point that you just give up and stop using a service that otherwise could be perfect for you. Here’s a quick primer for WordPress, Twitter and Facebook.

Firstly, understand the difference between what you need to know about and what you don’t. Not all notifications are equal! A good general guideline is if a notification requires no action from you, it’s non-essential. Some notifications (such as being told when people ‘like’ something you’ve posted) can actually contribute to social media stress, which is another good reason to turn them off.

WordPress

WordPress notifcations settings

For notifications about likes, comments and pingbacks (when people have referred to your blog on their blog) go to ‘Settings’ – ‘Discussion’ and you’ll see the options for email notifications. If you are moderating comments it’s important to know when a comment is being held pending your review. You may wish to be told when you have a new follower (so you can check out their blog) or when someone posts a comment ( so you can respond).

Wordpress Reader notifications

For notifications of new blog posts from blogs you follow, go to your Reader (make sure you’re logged into WordPress. Hover over the WordPress logo top left and you’ll see the link). Your Reader shows the latest posts from blogs you follow. Click on ‘Edit’ top right, and from there you can see the blogs you follow as a list.

Wordpress Reader settings

Click on the small ‘Edit’ button next to a blog name and you can opt into email alerts for both new posts and comments, either instant, or as a digest. I tend to opt for weekly digests, that way if a blogger is prolific I’m not getting interrupted by their blog posts all the time, but I can catch up once a week all in one go. Of  course you can turn off all email notifications if you wish, especially if you use a tool like Feedly for reading and subscribing to blogs. Feedly presents all new posts from blogs you follow in a neat magazine-style webpage.

If you comment on another blog and want to keep track of the conversation you can subscribe to the comments on that post. It’s a good idea to turn off comment notifications once the conversation has ended, or if there are a LOT of subsequent comments. You can turn off ‘following comments’ from a link in the email alert you are sent.

Twitter

Go to Settings (cog icon top right) and select ‘Email notifications’. From here you have a range of options allowing you to control how much email you get.

Twitter email notifications

The first section  ‘Activity related to you and your tweets’ is worth working through carefully. The choice ‘Tailored for you’ means Twitter will make an informed guess about when you want a particular notification.

From there onwards, the level of priority gets lower. There are probably quite a few things you can leave unchecked. Remember, you’re trying to cut down on unnecessary emails.

Twitter has a page explaining about email preferences here.

Facebook

From your profile page, hover over the down-arrow top right and click on ‘Settings’. From the General Settings page click on ‘Notifications’ in the left hand menu.

Facebook Settings

The first section is ‘How you get notifications’ which allows you to choose the medium – on the web only, on your phone and/or by email. Look at the options available to you. Under ‘email’ for example, you can opt for ‘all notifications’, ‘important notifications about activity’ or ‘only notifications about your account, security and privacy’. I would recommend either option 2 or 3.

FB notifications settings

The next section is ‘what you get notified about’. Again, don’t skip over this lightly.  If you’re getting too many notifications about activity in Groups you belong to, or people you are Friends with, you can limit it here.

If you have Followers (who aren’t necessarily Friends – very handy if you’re an author and want to distinguish between the two audiences) go to the Followers link on the left hand menu and create your desired settings for your communication with them.

NB If you are using Facebook and haven’t yet been through ALL your settings, including Privacy, Blocking and Timeline and Tagging, I recommend you do so. Think carefully about who you’re connecting with and how much access you want to give Friends, Friends of Friends, Followers and the general Public.